29/05/2018

http request and tcpdump

If you work with http reverse proxy one of the most frequent problem is that people working on the backend systems complain about things they expect but they don’t see coming from your frontend service.
Working with Tivoli Access Manager this happen to me every time I pass some value to the backend services like iv-user, iv-remote-address or LtpaToken… every time people open the browser, press F12 and expect to find those data into the http request exchanged with the browser… NO!!! It does not work like that! :\

In these moments the only way to close the case is sniff some packets and put them in front of their nose with a giant red arrow showing the damn data they are expecting and which is perfectly exchanged between TAM and backend servers.
You can do this in many ways, the fastest and simple imho is by one of the most important tool for problem solving and analysis, the swiss knife of every sysadmin: tcpdump.

In this case the syntax of tcpdump is a bit “esoteric”, here it is:

sudo tcpdump -nn -i <interface> -A -s 0 '<protocol> port <port> and (((ip[2:2] - ((ip[0]&0xf)<<2)) - ((tcp[12]&0xf0)>>2)) != 0)'

For example: sudo tcpdump -nn -i eth0 -A -s 0 ‘tcp port 80 and (((ip[2:2] – ((ip[0]&0xf)<<2)) – ((tcp[12]&0xf0)>>2)) != 0)’

If you want to grab the dump and open with some other software (for example the great Wireshark) you must add “-w /path/to/dump/dump.dmp”

That’s all.

14/08/2017

WebSphere 8.5 HTTPS handshake

Here is a new post for the usual “do not use humongous enterprise blobs” thread, this time the main character is IBM WebSphere Application Server 8.5.

Recently one of our developers deployed a new application which require some http requests to an external web service via https protocol, what’s the problem? Get the CA certificate, import into the WebSphere cell trust store and synchronize nodes, right?
Well, in this case we got this nasty exception each time the WebSphere JVM tried to start the https handshake:

java.lang.ArrayIndexOutOfBoundsException: Array index out of range: 64

Googling around I found the problem, the webserver which hosts the web service uses TLS protocol (which is good for security) with Diffie-Hellman group key size of 2048bit (which is definitively good for security), by default WebSphere Application Server 8.5 uses SSLv3 (bad) and TLS1.0 protocols when it acts as https client (SSL_TLS configuration), and gives this exception when it handshakes https using TLS1.0 with a server which uses a 2048bit DH key.

As always we were in a hurry (meh… :\) and this issue blocks the developers, since we were working on a develpment environment I suggested to create a new virtualhost which will host the webservice with a smaller DH key, just as workaround while we found a solution.
The sysadmin on the webservice side agreed so he created this new virtualhost with a new https certificate and configuration (none of those services were available from the web).
Everything set so we changed the webservice url on our application, but we got the same exception… so I found that our WebSphere Instance can’t handshake virtualhosts because it still uses IBM JVM 1.6 which do not support server name identification (SNI).
Fantastic, welcome back to the year 2006 :\

So I tried another solution, force WebSphere to handshake with TLS1.2 protocol, that will work with 2048bit DH but we have to test any other application deployed on the WebSphere instance and make sure that every https handshake work as expected.

Log on the WAS console on the deployment manager (if your architecture is a cluster) and go to Security -> SSL certificate and key management -> Manage endpoint security configurations, from the local topology choose a Node from the inbound tree.
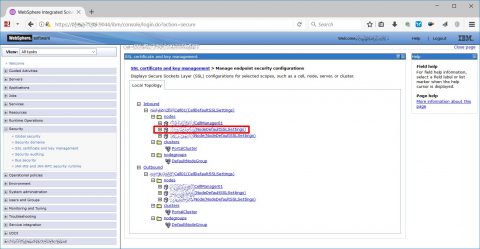
Then choose “SSL configurations”
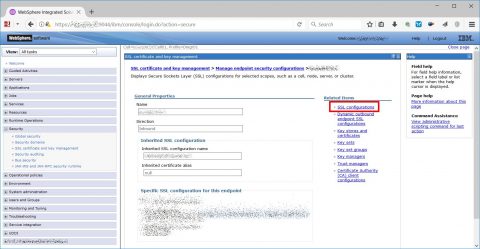
Choose CellDefaultSSLSettings and “Quality of protection (QoP) settings”…
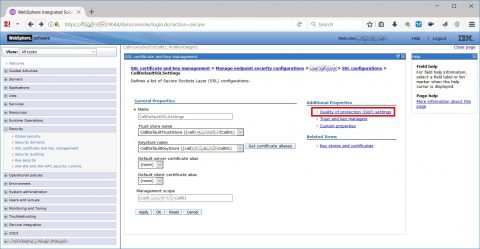
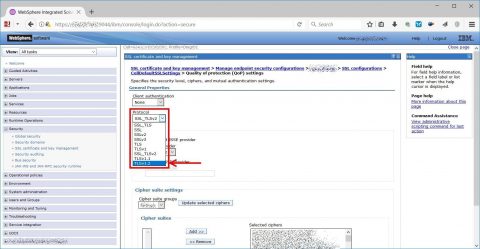
…and from protocol dropdown choose TLSv1.2 option, after that apply, save configuration and repeat from the previous point selecting NodeDefaultSSLSettings instead of CellDefaultSSLSettings.
Now you must edit two ssl.client.props files, one inside Deployment Manager root and one inside AppServer root, in my case those files were in:

  • <WebSphere ROOT>/AppServer/profiles/Dmgr01/properties/ssl.client.props
  • <WebSphere ROOT>/wp_profile/properties/ssl.client.props

Inside the files you must find “com.ibm.ssl.protocol” variable and change its value from SSL_TLS to TLSv1.2 on all your WebSphere server and restart all services (Deployment Manager, Node Agent and WebSphere instances).

After the reboot all seems to work, finally our web application completed the https handshake using TLS 1.2 and the 2048bit DH key, problem solved? No :(

After the restart we noticed some bad issues during the Node Agent synchronization, checking its SystemOut.log I found this nasty exception:

WebSphere javax.net.ssl.SSLHandshakeException: Client requested protocol TLSv1 not enabled or not supported

The synchronization process between Node Agent and Deployment Manager uses https protocol and during the handshake the Node Agent act as client and use TLS 1.0 protocol while the previous configuration forces TLS 1.2 protocol.
To solve this problem I found that one of the other options (SSL_TLSv2) extend the default option (SSL_TLS) adding TLS 1.1 and TLS1.2 protocols, that seems perfect so I repeated all the previous steps (protocol selection for incoming CellDefaultSSLSettings and NodeDefaultSSLSettings and ssl.client.props for Deployment Manager and Appserver instance) using SSL_TLSv2 value instead of TLSv1.2.

After a full restart finally everything seems to work.

27/02/2017

Windows 10 reset network stack

Recently a friend of mine had a problem with his new Dell laptop upgraded to Windows 10 x64; the OS seems to connect to the LAN via wifi nic, it reaches the default gateway but no web browsing and ping on a reachable host (for example www.google.com) returned “general failure error”

DNS resolution OK
Routing table clear
No blocking firewall or security application
No suspect malware or anything strange on software
No hardware problem (checked with a live GNU/Linux distro)
No network problem with other devices
No useful trace on event log

It seems the Windows network stack went crazy so I tried to reset it to default parameters.
Start command prompt with administrative rights and launch:

  • netsh winsock reset catalog

    for reset WINSOCK entries to installation defaults.

  • netsh int ipv4 reset

    for reset IPv4 TCP/IP stack to installation defaults.

  • netsh int ipv6 reset

    for reset IPv6 TCP/IP stack to installation defaults.

  • restart

Problem fixed ;)

30/09/2016

Upgrade MySQL 5.1 to 5.7

I love RedHat/Centos 6.x, I think it’s one of the most stable and reliable GNU/Linux distros in the recent history of this OS, it’s actually one of the most used, and yes, I love it because it doesn’t use the cursed systemd (I can get used to it but don’t ask me to love it…).

Despite of all its good features Rhel/Centos 6.x family has one big fault, it has too many old packages, and MySQL is one of them.
Consider that the MySQL version distribuited by the official repository is 5.1 which was released in 2005, 11 years ago!!!
Recently I decided to upgrade some of our MySQL instances and I struggled searching for the right procedure to reach the goal.

Apparently everything seems easy, install the official MySQL community yum repository…

01

…and launch a “yum upgrade”, right? Well, no….

02
Check MySQL error log and the cause seems to be the innodb_file_format.

03

Googling around I found an easy solution, add “innodb_data_file_path = ibdata1:10M:autoextend” to your my.cnf file and restart, easy!
Well again no…

04

But how can I run mysql_upgrade if my MySQL instance doesn’t start?
Ok take a breath and rollback to 5.1, this time let’s try the upgrade step by step, for instance let’s upgrade from 5.1 to 5.5 and then from 5.5 to 5.7.

For the upgrade to version 5.5 I suggest to use Remi repository, enable it and EPEL using rpm packages.
Remember to enable Remi repository and not only Safe Remi repository (change enable=o to enable=1 in /etc/yum.repos.d/remi.repo file).

05

Now launch “yum upgrade”, check that MySQL is running with “service mysqld status” and eventually start it with “service mysqld start” and launch mysql_upgrade

06 08

Now if you try to upgrade to MySQL 5.7 via the official MySQL Community repo you will get this bad conflict with some libraries

09

To avoid that mess you have to:

  1. install MySQL-shared-compat-5.6.33-1.el6.x86_64.rpm (rpm -ivh MySQL-shared-compat-5.6.33-1.el6.x86_64.rpm)
  2. remove compat-mysql51-5.1.54-1.el6.remi.x86_64 (rpm -e compat-mysql51-5.1.54-1.el6.remi.x86_64) and remove Remi and EPEL repositories if you don’t need them
  3. install MySQL Community repository
  4. check your repository

10

After that upgrade to MySQL 5.7 launching “yum upgrade”

11

Ok, now check that MySQL 5.7 is running, launch mysql_upgrade and follow instructions for upgrade tables or anything else.

12

02/07/2016

Psi Probe error

If you work with j2ee application you need Tomcat and not some stupid gigantic enterprise application server, and if you work with Tomcat you really need Psi Probe because it’s the best Tomcat manager you can find all over the galaxy.

Recently I noticed a strange behavior from this tool after some activities focused on security hardening.
I had some old Tomcat 6 instances where I want to get rid of Tomcat version inside error pages and inside http headers, after I removed these data Psi Probe went crazy with a nasty exception “java.lang.RuntimeException: No container found for your server” :\

error

After some googling I found that Psi Probe uses ServerInfo to determine the Tomcat version, I completely erased this information for security issues so the poor Psi Probe lost its mind…

The solution is quite simple, open the probe.war archive (you can unzip it) and change the WEB-INF/spring-probe-resources.xml file this way:

  1. find “forceFirstAdaptor” variable inside the “com.googlecode.psiprobe.beans.ContainerWrapperBean” and change it’s value from false to true
  2. change the list inside the “adaptorClasses” property putting as first record the value referring to your Tomcat version (in my case “<value>com.googlecode.psiprobe.Tomcat60ContainerAdaptor</value>”)

spring-probe-resources

After that you only have to repackage the files and deploy the war.

« Post precedenti | Post successivi »