26/06/2025
Raspberry PI 5 NVMe upgrade
I just switched from my previous 1TB SATA SSD over USB to a new NVMe 2TB drive via PCIe slot on my Raspberry PI 5 home server.
I have to use a meme because I can’t express how fast and responsive it is… :P
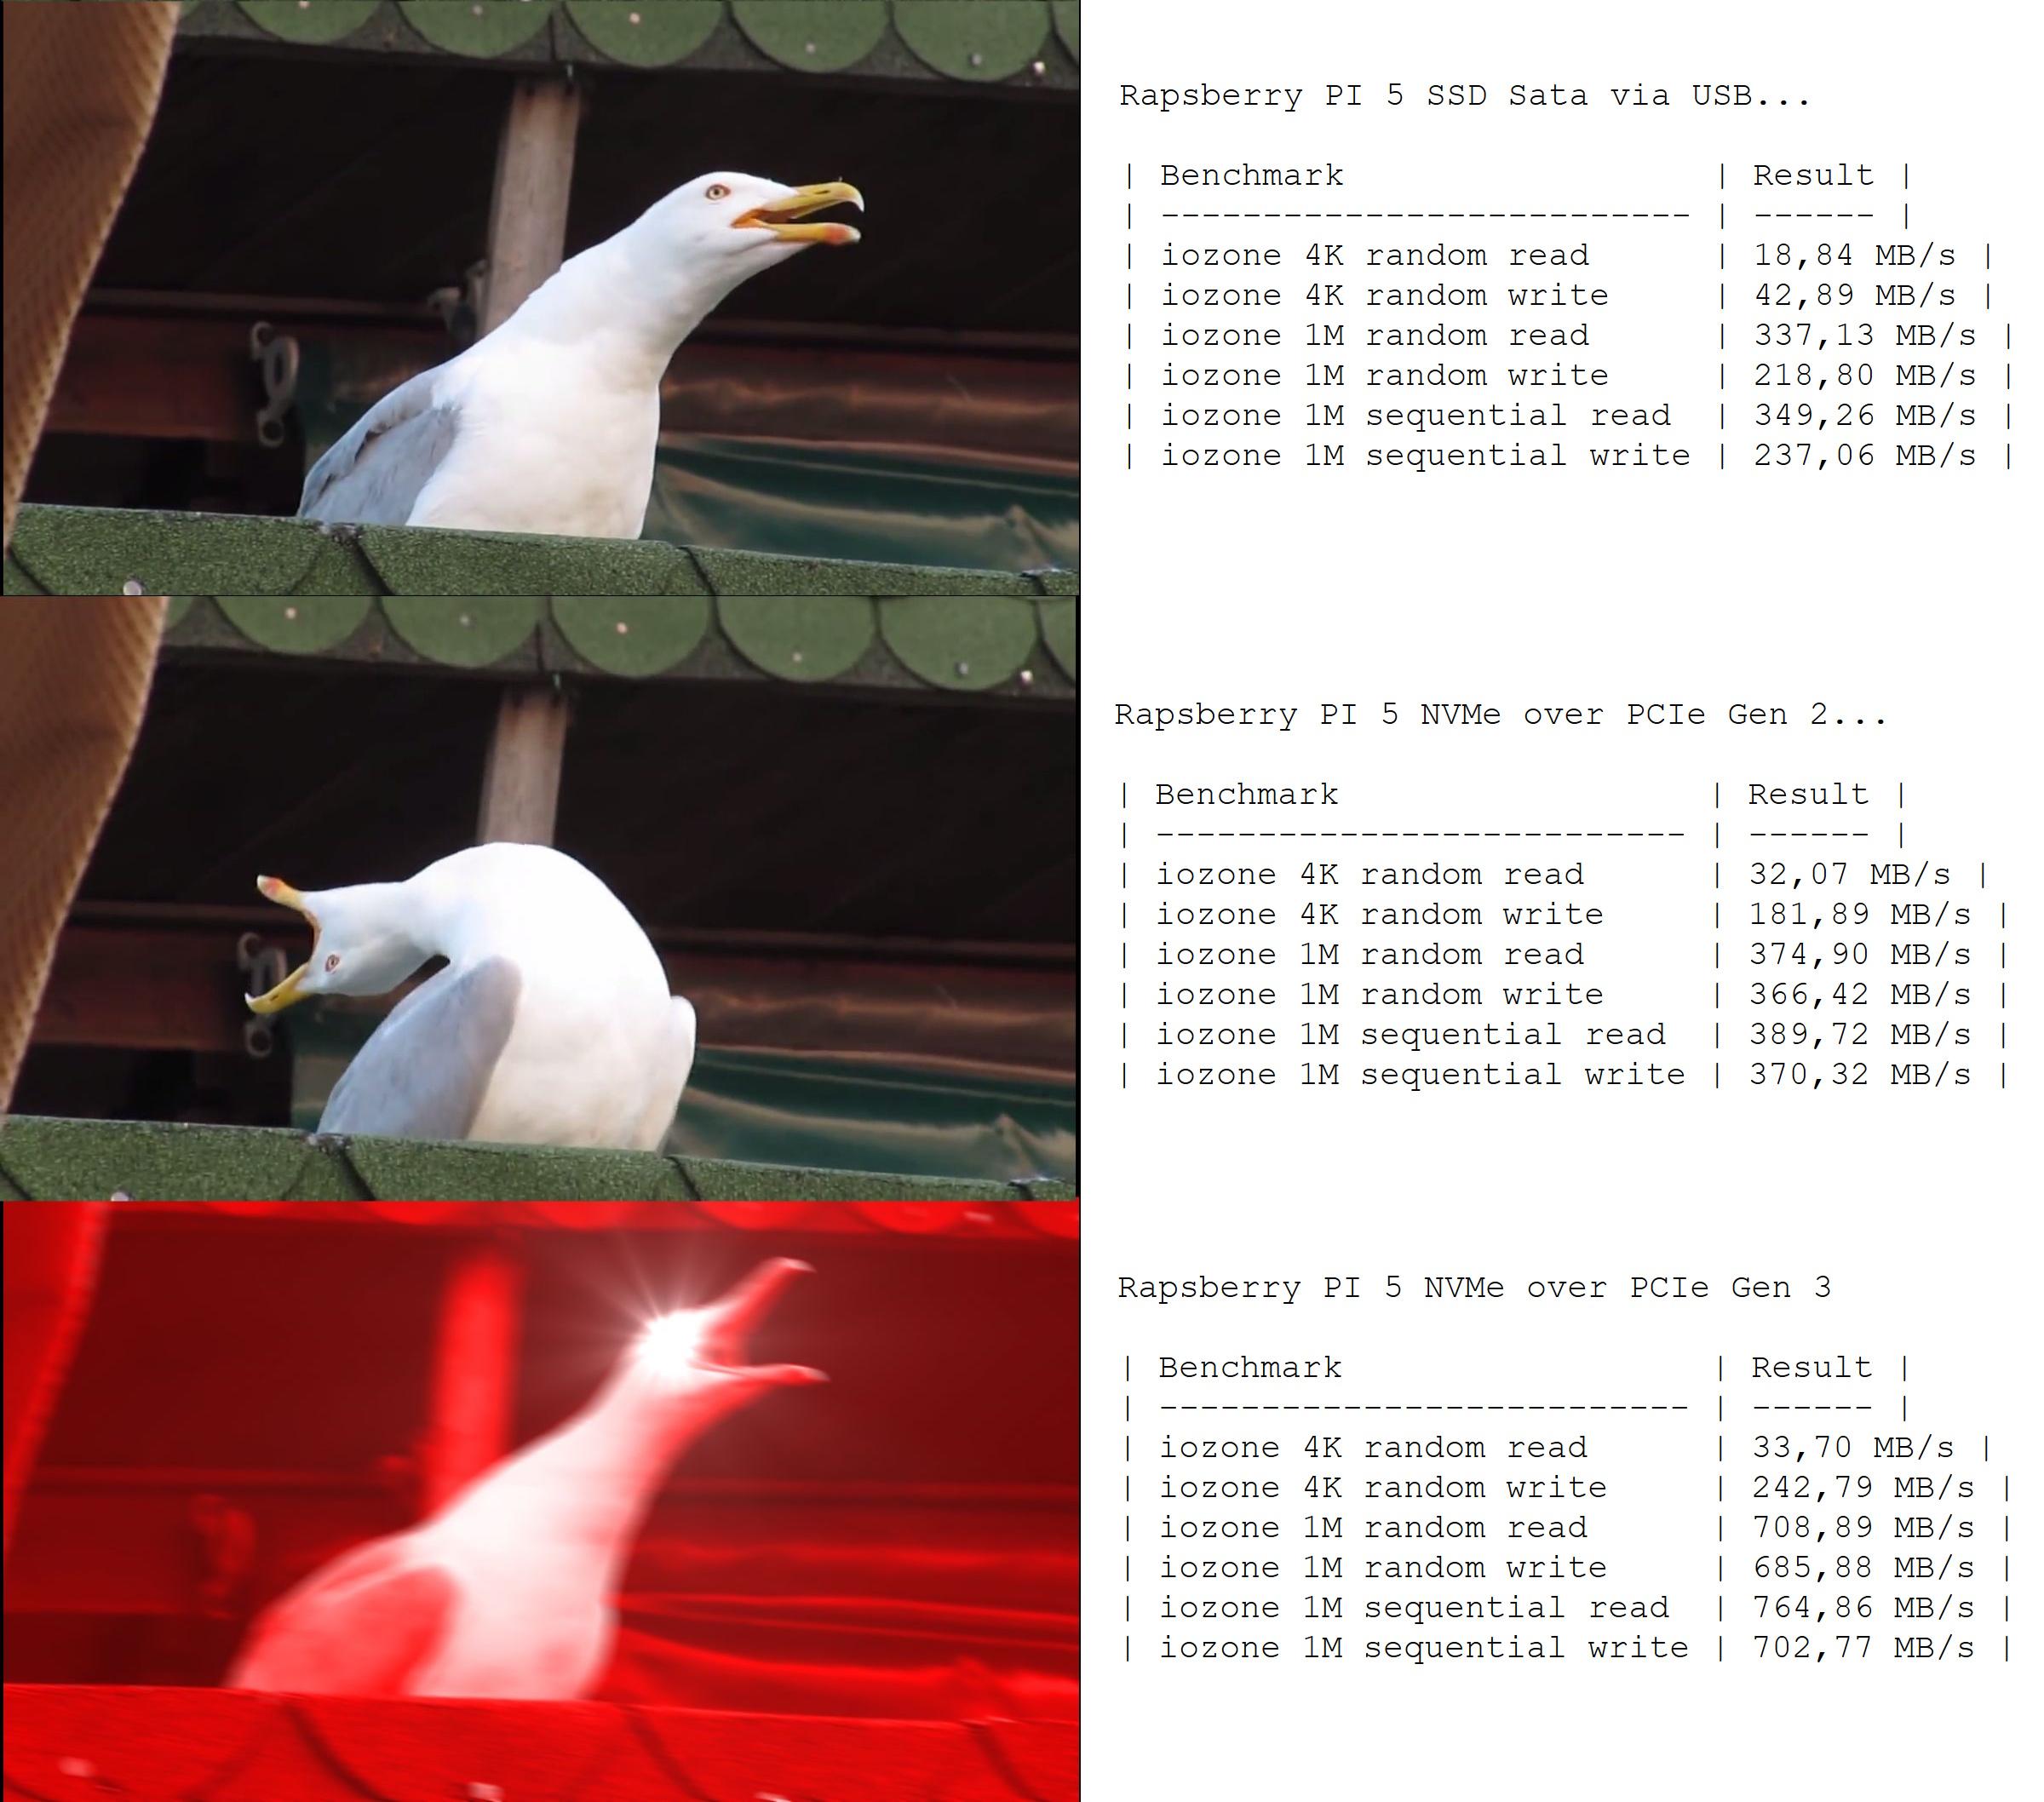


I just switched from my previous 1TB SATA SSD over USB to a new NVMe 2TB drive via PCIe slot on my Raspberry PI 5 home server.
I have to use a meme because I can’t express how fast and responsive it is… :P
It’s been a while since a started using a Raspberry Pi 4 as a home server instead of my old Banana PI, yesterday I was following a interesting thread on a forum regarding RPi5 compared to some x64 boards, specially those using Intel N100 processor.
This thread made me remember the good old days when I started using my ancient Via Epia board and I won a forum competition for the home server with the lowest possible power consumption.
Now seems like people complains about RPi because of its cost and it’s performance/power ratio compared to other boards, like those using Intel N100, and this pushed me to check out my beloved Pi power consumption, let’s bust some myths!
Before starting let me roughly explain how I use my RPi4, just to clarify that it’s not an idle server stuck in a closet to absorb electricity:
Not let’s take a look to my setup:
To measure power consumption I used a Shelly Plug and an external self powered USB hub for measuring each usb drive.
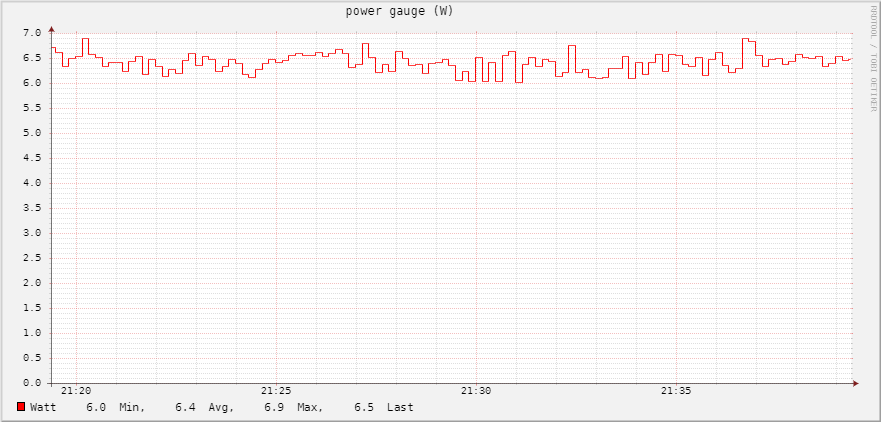
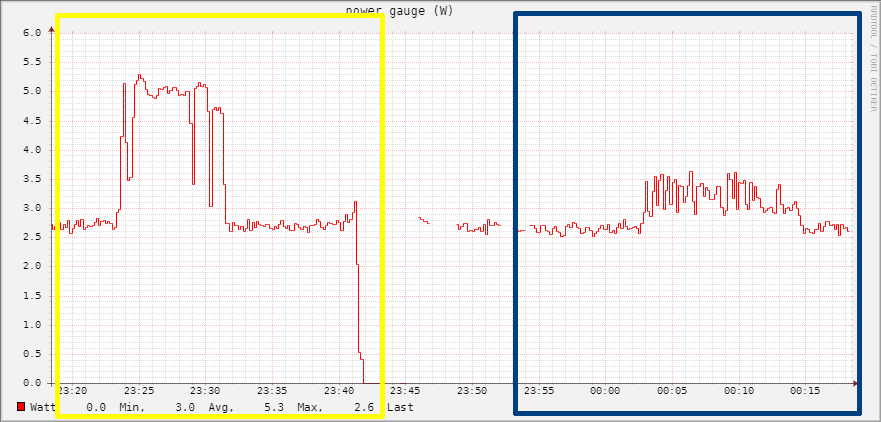
This is my RPi4 power consumption on idle with the two usb drives, as you can see we’re on a 6.4W average, not bad…
Here is the Pi with only the SSD, around 4.7W

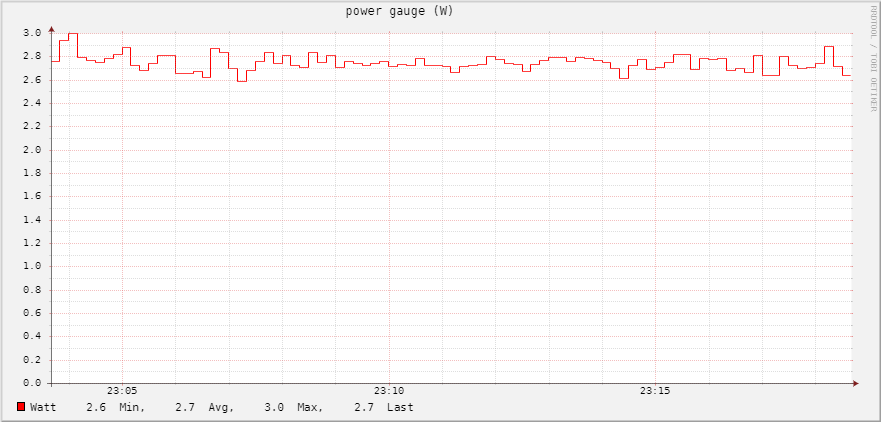
And here’s the mechanical HDD by itself at around 2.7W
As you can see the sum of the Pi+SSD (4.7W) and the HDD (2.7W) is over the average power consumption of the three devices all together (7.4W vs 6.4W), and that’s pretty normal, attaching the HDD directly to the Pi and power it via Pi’s usb ports is more efficient, and does not have the overhead of the usb external hub (which probably is less efficient as the Pi and its PSU).
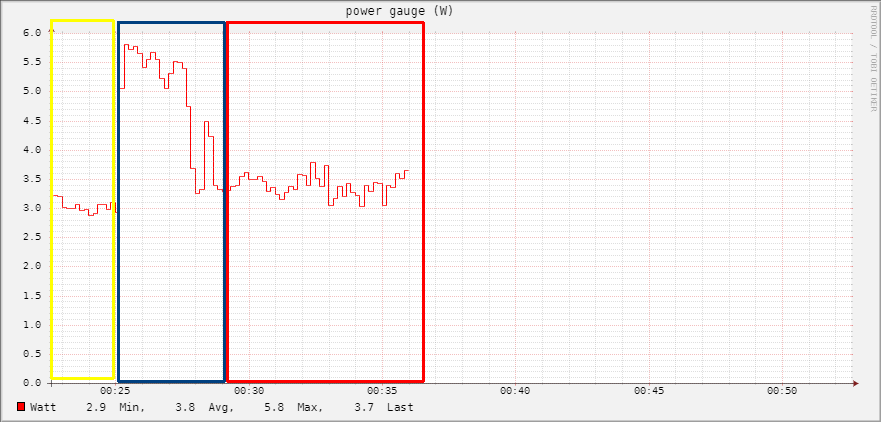
Let’s continue with the hard drives, in this test I measured the power consumption of the SSD and the HDD powered via the USB external hub.
This test imho is particularly interesting because it show something unexpected to me, the yellow box shows the HDD test while the blue box shows the SSD test.
As you can see the idle power consumption is not that different between the two drives (~2.7W), and that’s shocked me because I thought the SSD would be much more energy efficient and less power hungry. If we move to the stress test we can se a huge difference between the two, and that’s what I was expecting to see.
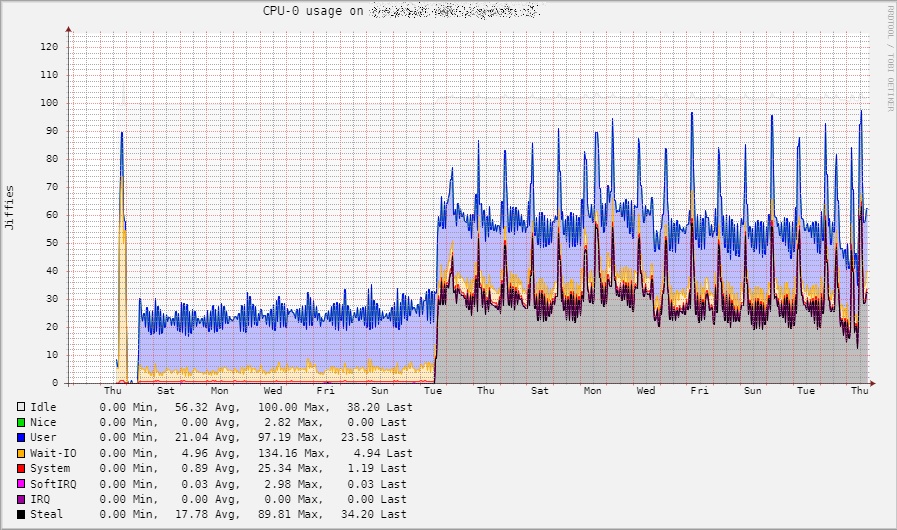
And finally we can see how the application load really impact on the power consumption.
For this test I measured only the Pi power consumption without SSD or HDD, in the first section (marked in the yellow box) you can see the Pi consumption on idle with only the basic OS (Debian 11) running on it, then I started all the application I usually run on it, all together (check the spike in the blue box), then finally the Pi with all the services running on it (red box).
As you can see there’s no such difference between an idle system with basically no services running on it, and the system with all the services I mentioned at the beginning running on it.
Obviously we’re talking about a home server solution, with basically one user and a few hosted sites (but we’re still talking about small WordPress sites with a few Matomo instances and not a lot of visitors)
I hope this will be helpful if you’re thinking about buying a Raspberry Pi as your own home server.
Recently I received some complanings about load problems on an AWS EC2 t2.medium instance with CentOS 7, despite being a development environment it was under heavy load.
I checked logs and monitoring and excluded any kind of attack, after a speech with the dev team it was clear that the load was ok for the applications running (some kind of elasticsearch scheduled bullshit).
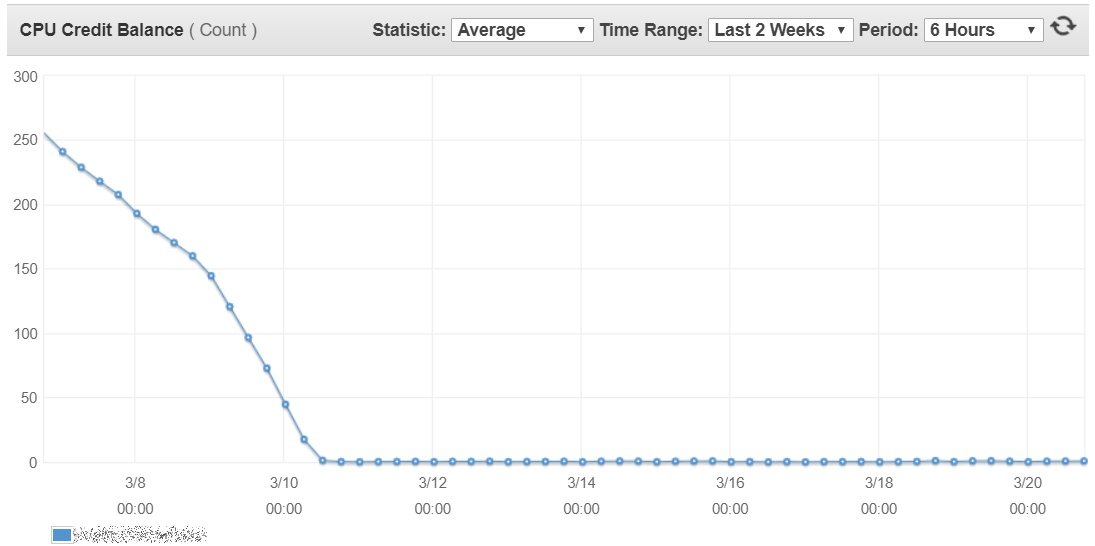
The load was 100% from cpu but I noticed some interesting behavior since a couple of weeks with a lot of steal load.
Looking to EC2 CPU Credits it was crystal clear that we ran out of cpu credits, which turned on some heavy throttling.
Since the developers can’t reduce the load from the applications and the management won’t move from EC2, the solution I suggested was to move to a different kind of instance specifically designed for heavy computational workloads and without cpu credits.
So I made some snapshots and launched a new C5 instance, piece of cake, right?
Well no… as soon as I started the new instance it won’t boot, and returned “/dev/centos/root does not exist” on the logs. :\
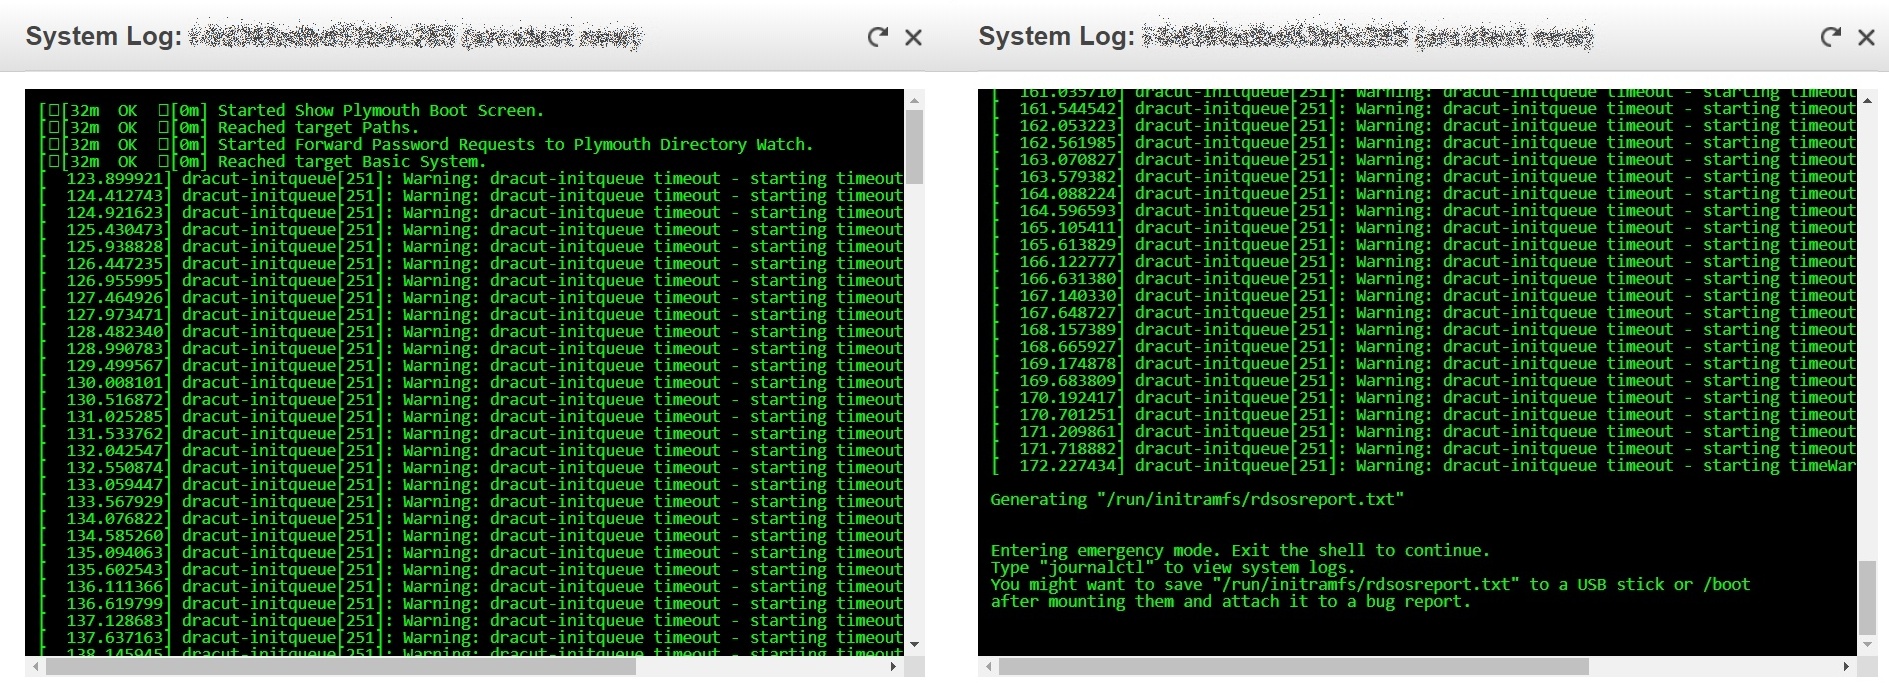
So what’s going on here?
Pretty simple, there are significant hardware differences between each type of EC2 instance, for example EC2 C type instances have NVMe SSD storage which require a specific kernel module, same for the network interface with ENA module.
The goal here is to make a new init image with these two modules inside, so during the boot the kernel could use these devices, and find a usable volume for boot and nic for network; the only problem is that we can’t simply boot the system using a live distro and build a new init image with those modules already loaded, remember we’re on AWS not on a good old Vmware instance (sigh…).
First of all I terminated the new instance, it was basically useless, and got back to the starting T2 instance.
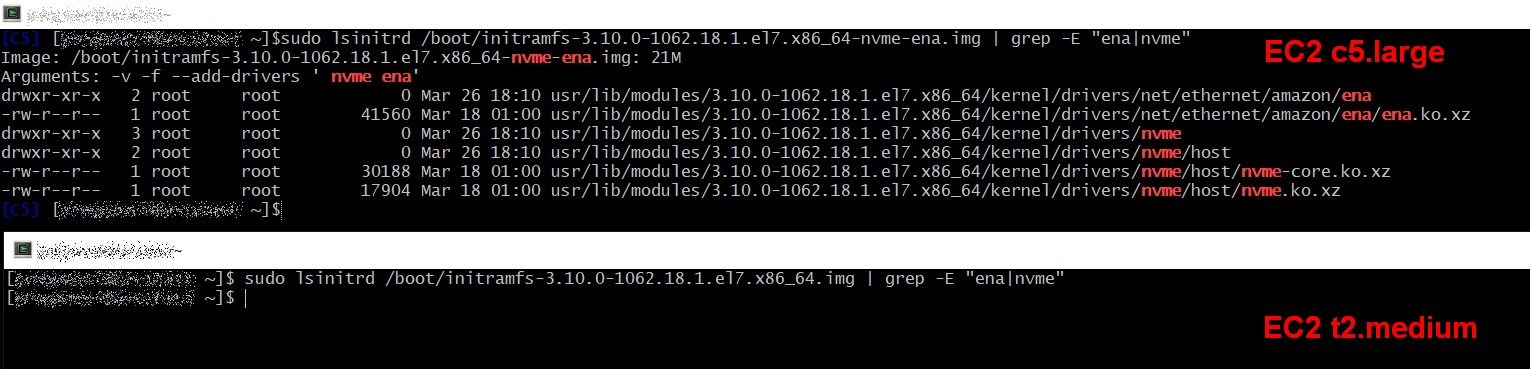
Check which kernel version you’re using with “uname -a” and build a new init image including nvme and ena modules using mkinitrd, for example:
mkinitrd -v --with=nvme --with=ena -f /boot/initramfs-3.10.0-1062.18.1.el7.x86_64-nvme-ena.img 3.10.0-1062.18.1.el7.x86_64
Using lsinitrd you can check that your new init image has nvme and ena module files inside.
Now you have to edit your grub config file (/boot/grub2/grub.cfg) and change your first menu entry switching from the old init image to the new one.
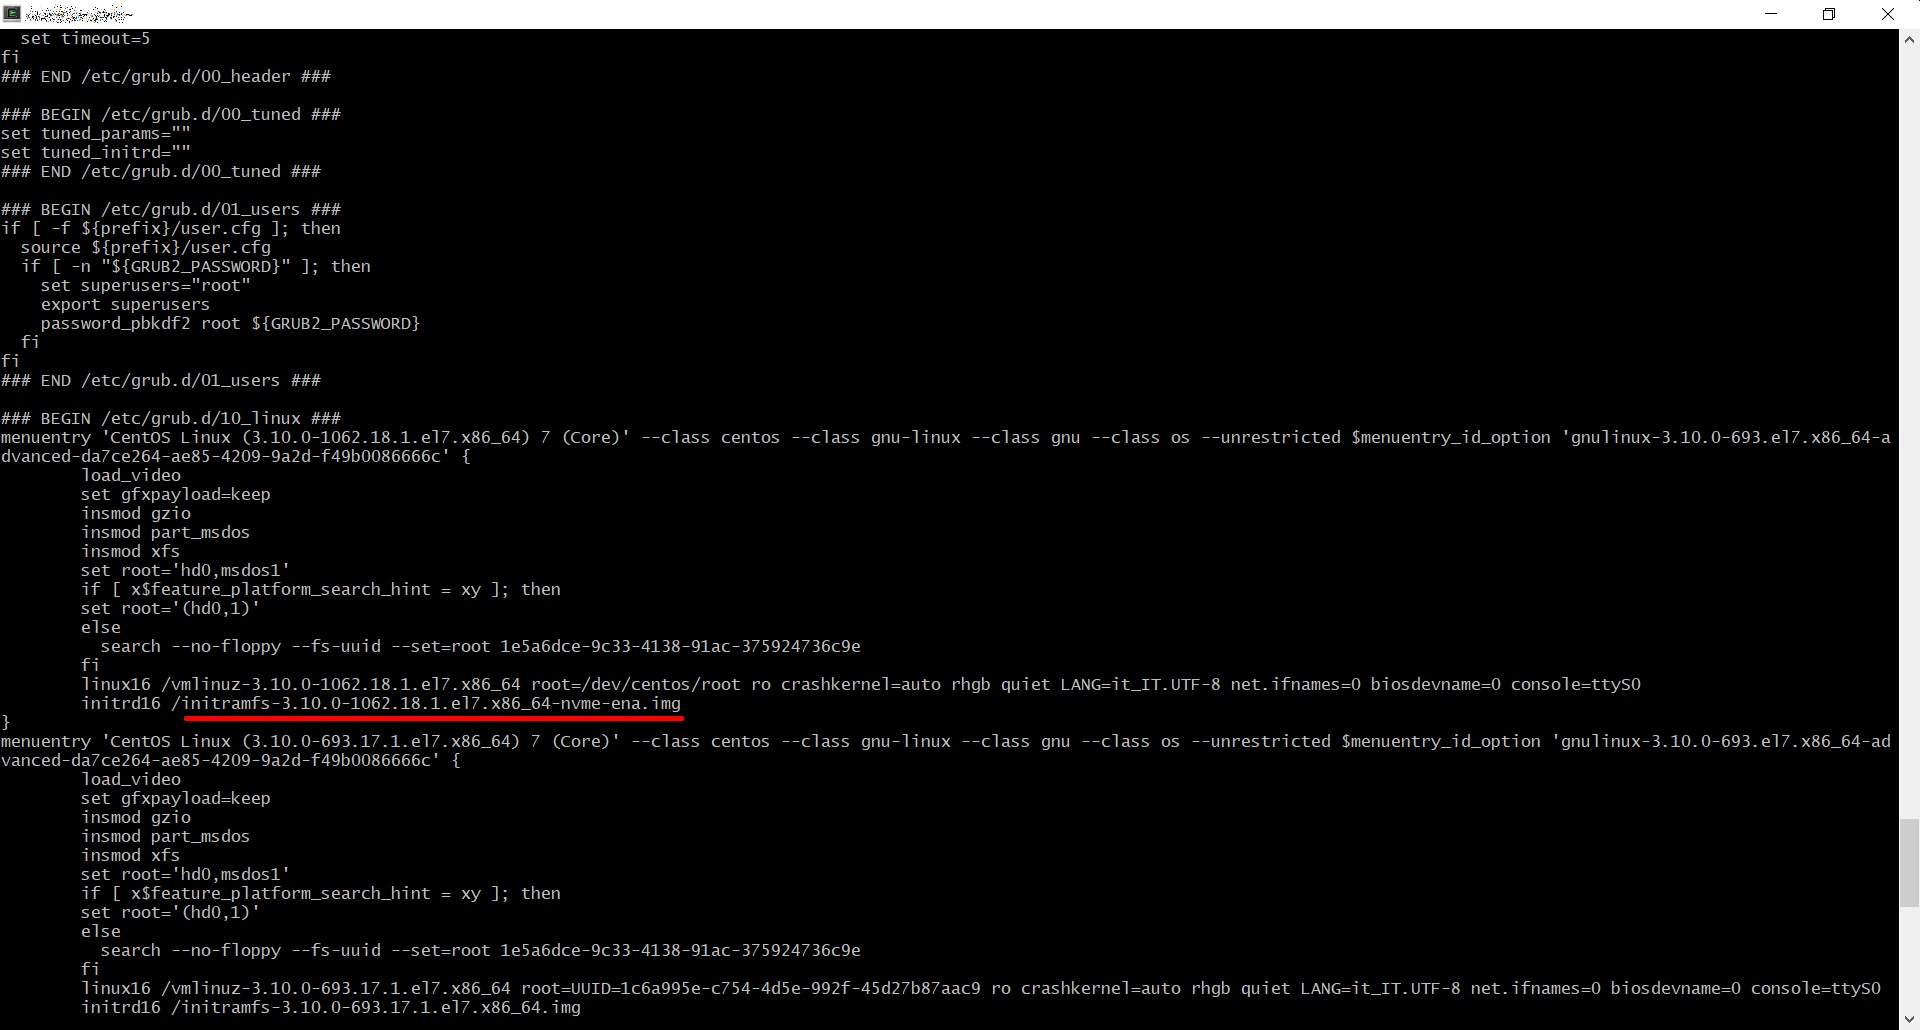
Save /boot/grub2/grub.cfg file, CHECK AGAIN YOU HAVE A GOOD SNAPSHOT OR AN AMI, and reboot, nothing should have changed.
Now you can make a new snapshot or AMI and build a new instance from it, choose a C type instance and now it should be able to boot properly.
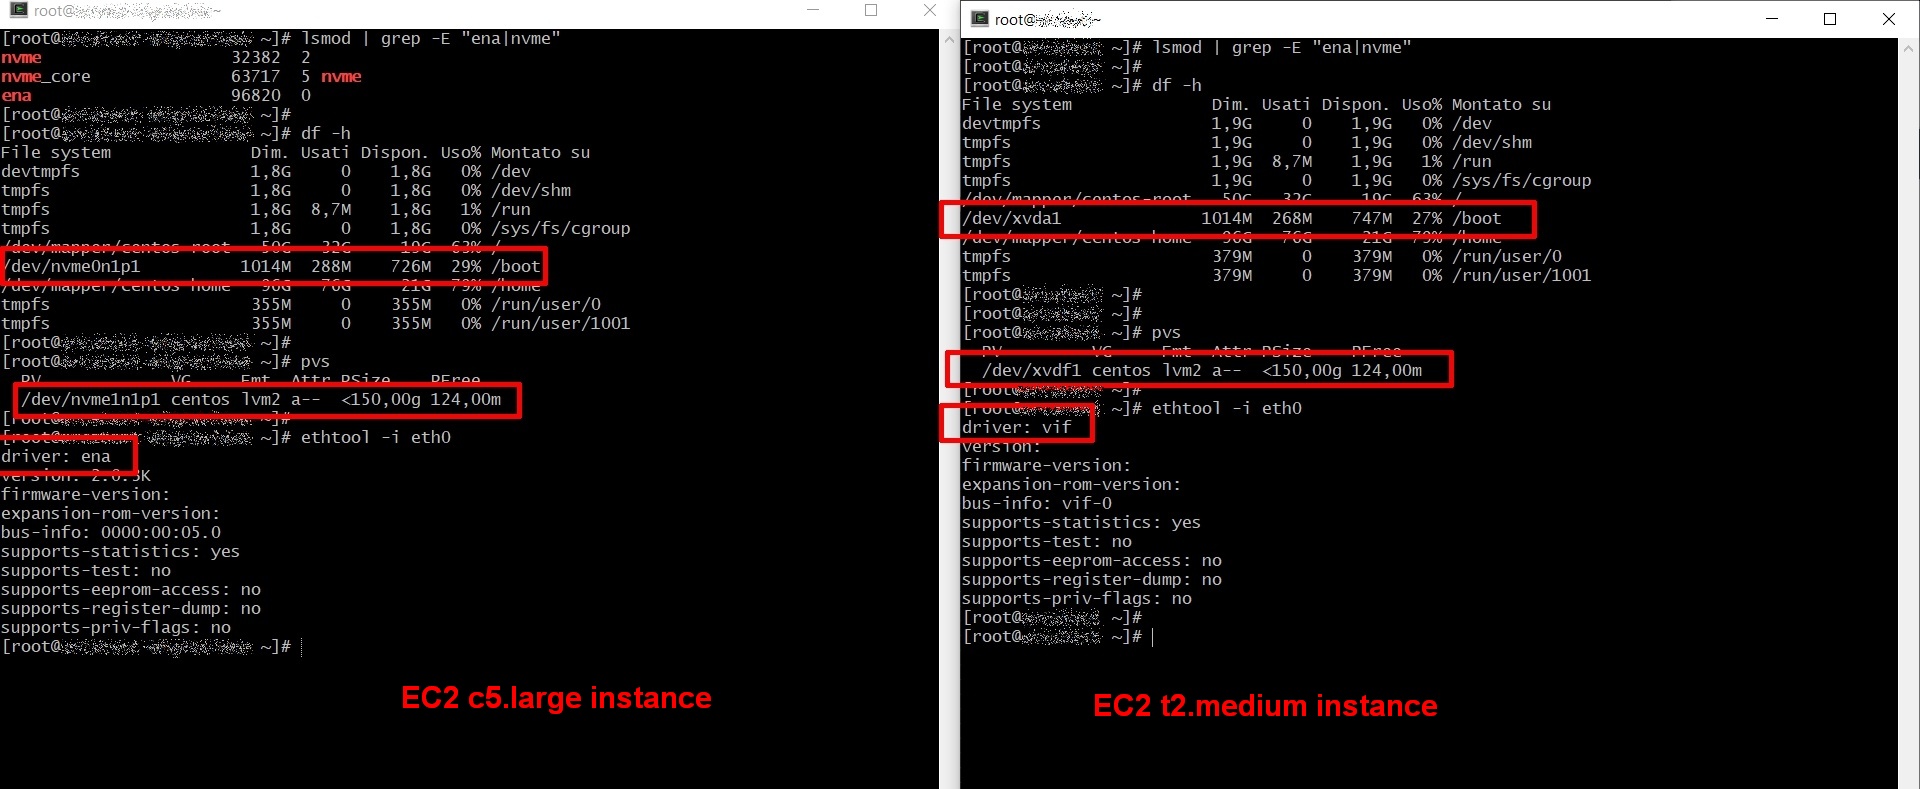
As you can see the new C5 instance have different storage device names, it has a new nic driver (ena) and it has ena and nvme modules loaded.
Life should be easier without the cloud… again.
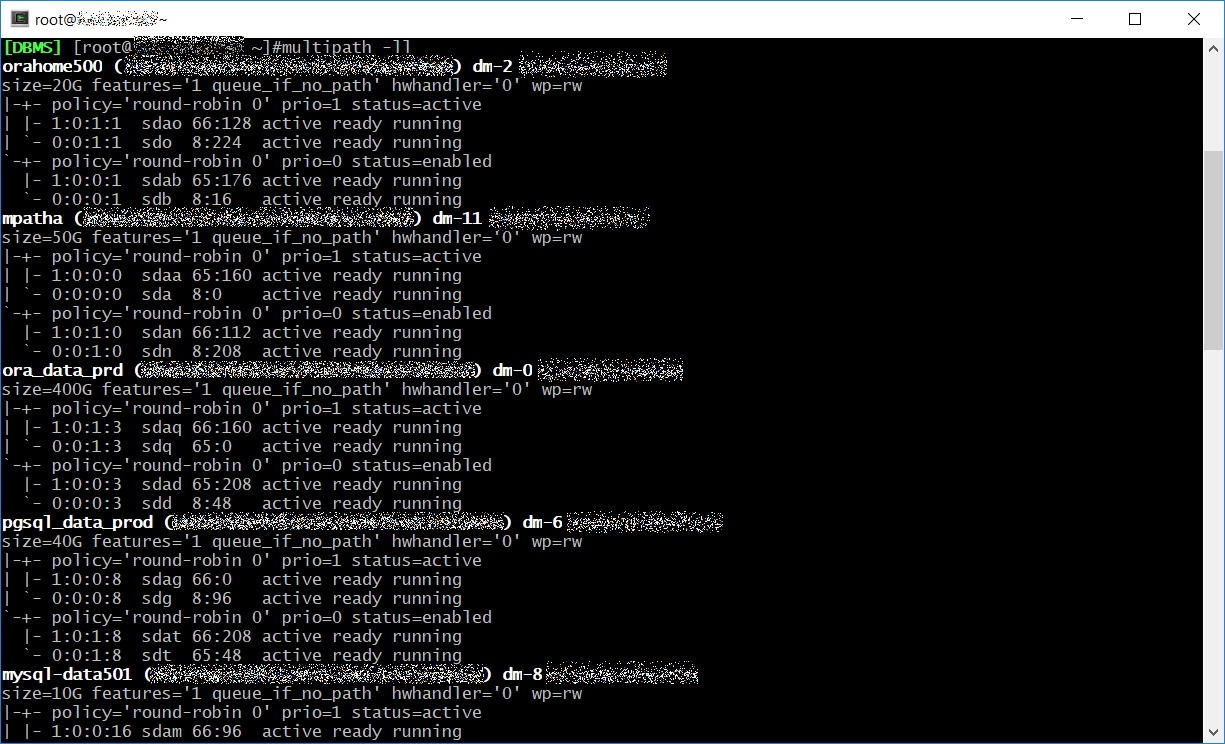 Regarding HBA all you need to know is under /sys/class/fc_host directory where you’ll find one host* directory for each device, inside those directories you’ll find port_name and node_name with WWPN and WWN.
With basic bash skills and ssh you can easily grab those information on each server, this is a trivial example.
Regarding HBA all you need to know is under /sys/class/fc_host directory where you’ll find one host* directory for each device, inside those directories you’ll find port_name and node_name with WWPN and WWN.
With basic bash skills and ssh you can easily grab those information on each server, this is a trivial example.
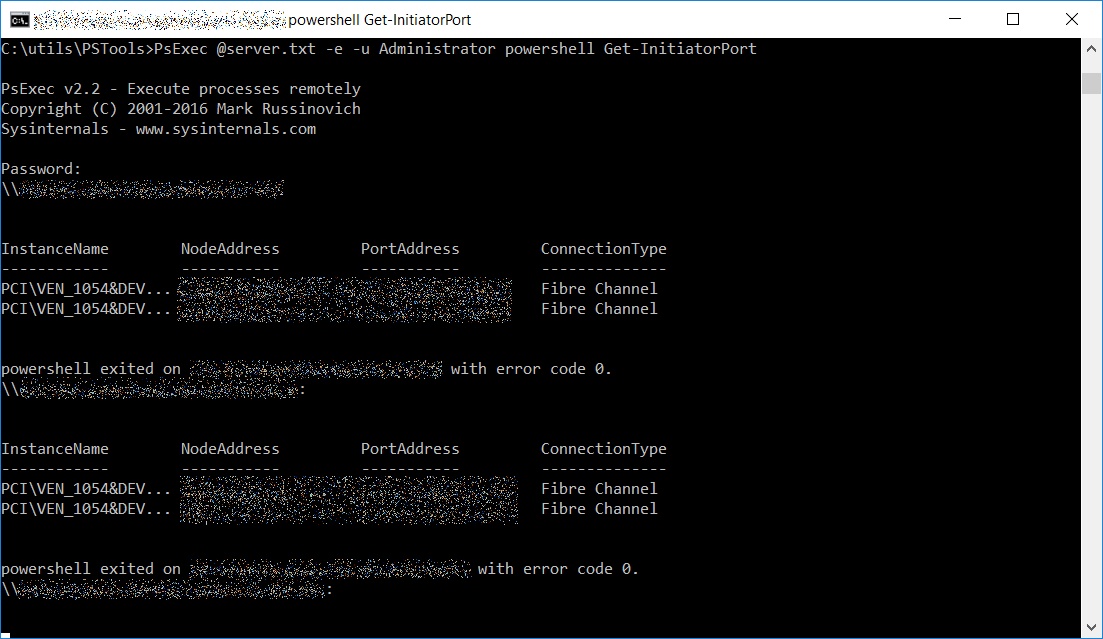
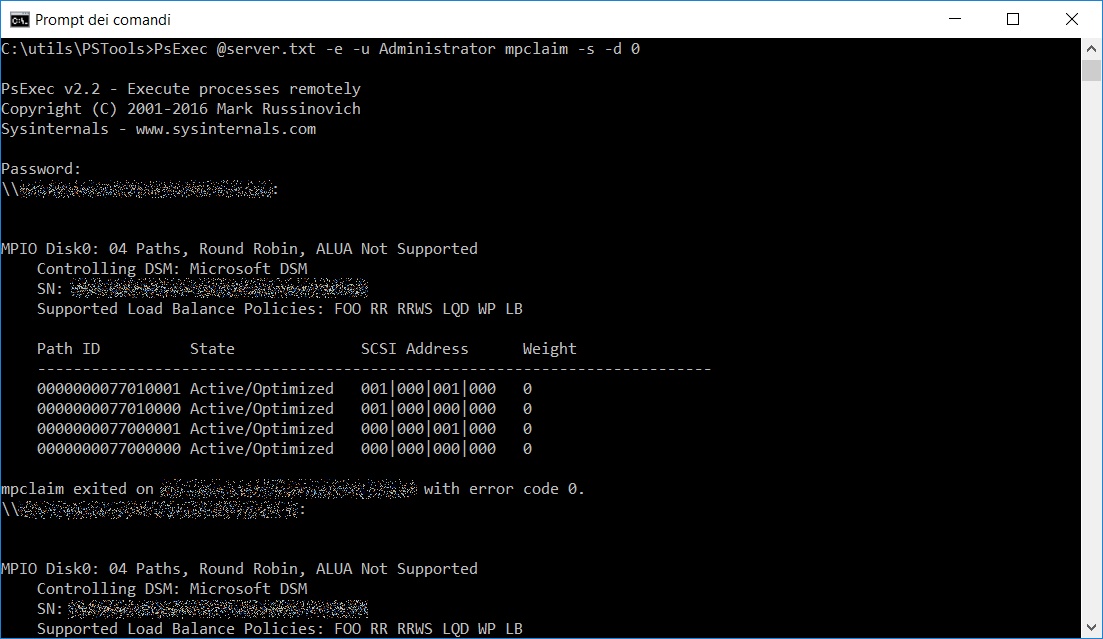 If you want to see all the details (for example node number and port number) of your HBA launch Get-InitiatorPort command on a Powershell instance with superuser grants.
PsExec @server.txt -e -u <USERNAME> powershell Get-InitiatorPort
If you want to see all the details (for example node number and port number) of your HBA launch Get-InitiatorPort command on a Powershell instance with superuser grants.
PsExec @server.txt -e -u <USERNAME> powershell Get-InitiatorPort
 You can find WWN and WWPN with “esxcli storage core adapter list”
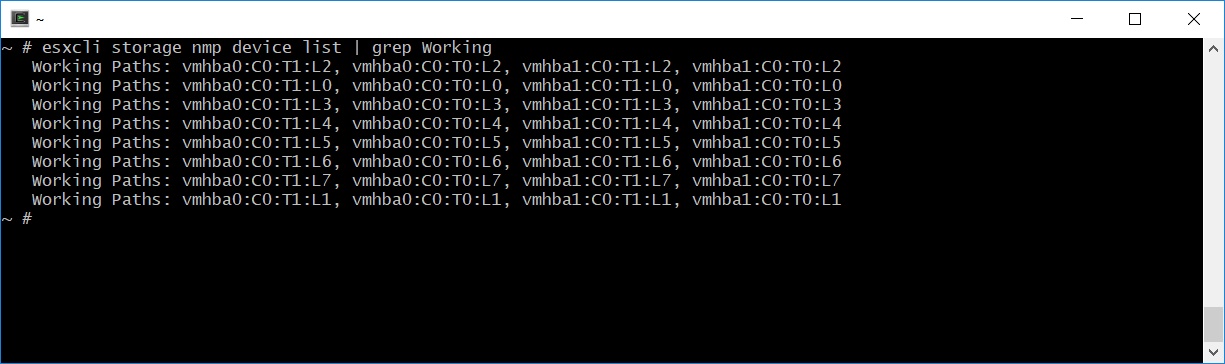
 As for GNU/Linux server you can easily cycle through your Vmware servers using ssh and bash to grab those information with a single script.
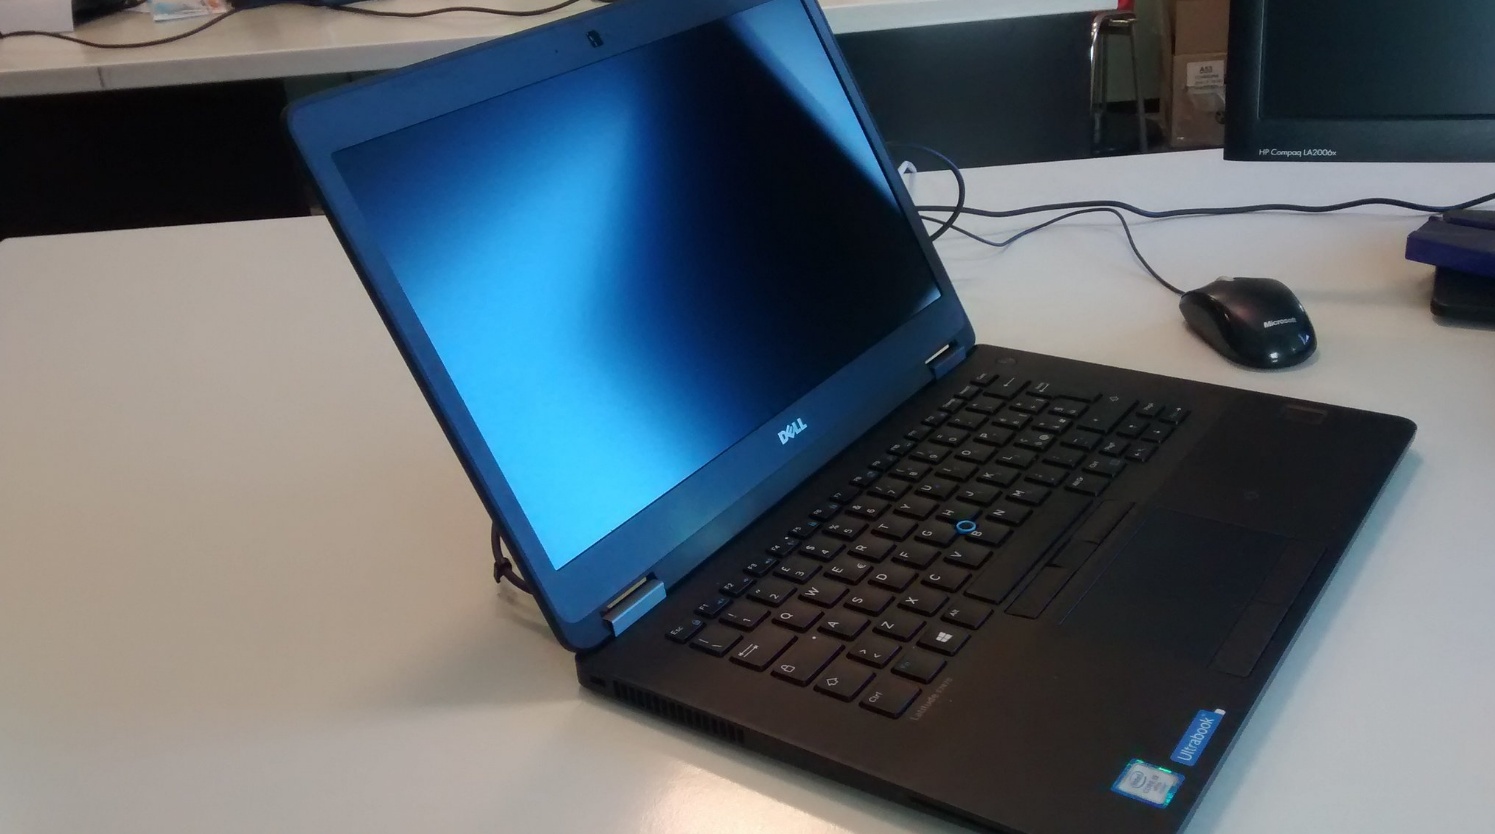
Finally I changed my working laptop, 8 years ago I switched from an old IBM ThinkPad R50 (yes! It was a true IBM ThinkPad!) to a T500 ThinkPad from Lenovo.
It was a good pc, not very powerful but sturdy, with a full size keyboard and so many options for upgrade like any other ThinkPad, a war machine!
Now the glorious T500 needs to retire, everything works but I need an SSD, the screen resolution was ridiculous, CPU and RAM were inadequate to run any virtual machine in local, so I started to look around for a new pc, these were the requirements:
I started looking for a laptop with these requirements and I came to the Dell Latitude 5000 series, nice line, solid, realiable and with a great customer care (this is my experience with any Dell product, pc or server).
Sadly I had a bad experience with a Dell partner so I started to looking around for an alternative… but last week one of our historic wholesale providers started to sell Dell products and I found the shiny Latitude E7470 which fits perfectly into my requirements to an honest price… check, check, check!

So, here it is my brand new laptop, my first experience with a Latitude product.
My first impressions:
The only complaint I had is about some keys (for example HOME and END keys which I use a lot) that need the FN key, and obviously the stupid Windows 10 scaling which blurs everything (but this is not a Dell problem).
And yes… I have to use Windows for now… :\
Here is the beast