16/03/2024
RPi4 power consumption
It’s been a while since a started using a Raspberry Pi 4 as a home server instead of my old Banana PI, yesterday I was following a interesting thread on a forum regarding RPi5 compared to some x64 boards, specially those using Intel N100 processor.
This thread made me remember the good old days when I started using my ancient Via Epia board and I won a forum competition for the home server with the lowest possible power consumption.
Now seems like people complains about RPi because of its cost and it’s performance/power ratio compared to other boards, like those using Intel N100, and this pushed me to check out my beloved Pi power consumption, let’s bust some myths!
Before starting let me roughly explain how I use my RPi4, just to clarify that it’s not an idle server stuck in a closet to absorb electricity:
- backup server (I keep the main backup copy on the Pi, every night I start a second server via PoE and I sync any backup on it and on a Backblaze B2 bucket)
- hosting server (a few sites, mainly based on PHP cms and published via Cloudflare Tunnel)
- personal wiki with Bookstack
- PiHole server
- phpIPAM server
- Nagios server to monitor my network and my devices
- Collectd + Collectd Graph Panel to monitor resources usage
- Uniquiti Unifi Controller to manage my Wifi APs
- Document management system with Paperless NGX
- Wireguard server for VPN
- Gitea as my private git repository
- Webmail server with Roundcube to get any notification from my cron jobs and devices on LAN
- Immich as a backup server for media on mobile devices
- Jellyfin server
- Vaultwarden as password manager
- several LAMP stacks here and there to try things, web projects etc etc…
Not let’s take a look to my setup:
- Raspberry Pi 4B with 8GB of ram
- Crucial BX500 240GB SATA SSD as a boot device via usb on the RPi4
- Seagate ST1000LM024 1TB SATA 2.5″ hard drive as a data volume connected via usb to the RPi4
To measure power consumption I used a Shelly Plug and an external self powered USB hub for measuring each usb drive.
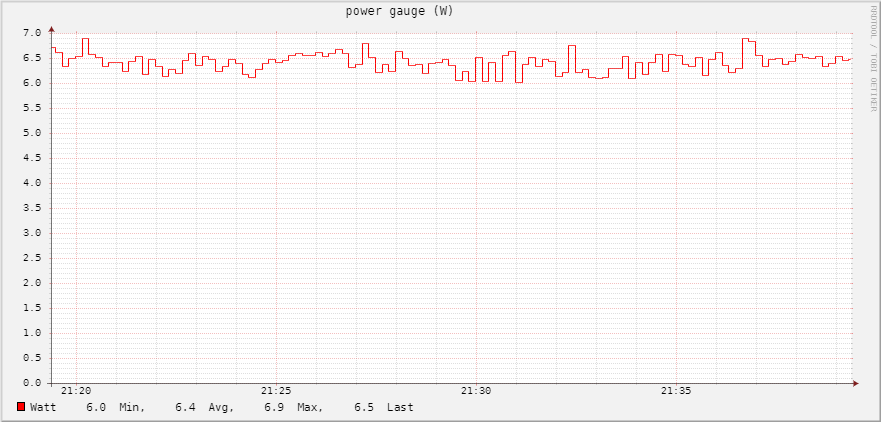
This is my RPi4 power consumption on idle with the two usb drives, as you can see we’re on a 6.4W average, not bad…
Here is the Pi with only the SSD, around 4.7W

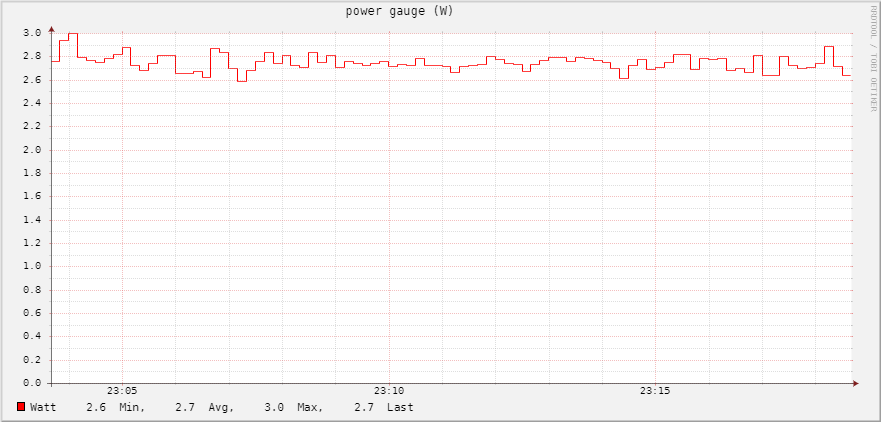
And here’s the mechanical HDD by itself at around 2.7W
As you can see the sum of the Pi+SSD (4.7W) and the HDD (2.7W) is over the average power consumption of the three devices all together (7.4W vs 6.4W), and that’s pretty normal, attaching the HDD directly to the Pi and power it via Pi’s usb ports is more efficient, and does not have the overhead of the usb external hub (which probably is less efficient as the Pi and its PSU).
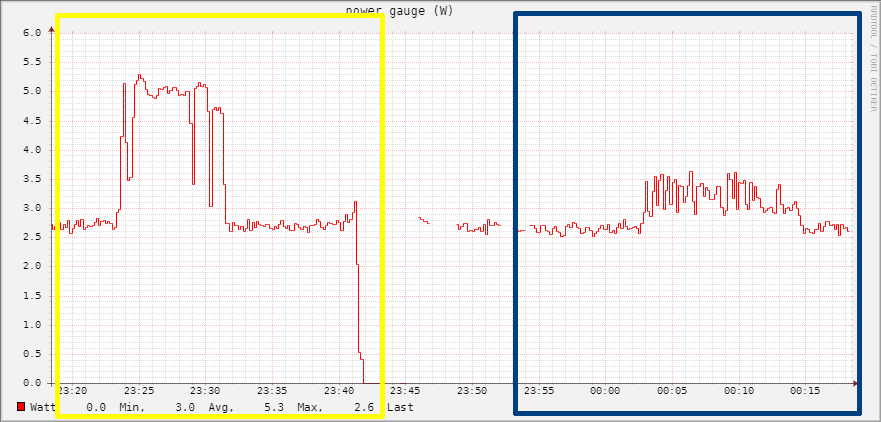
Let’s continue with the hard drives, in this test I measured the power consumption of the SSD and the HDD powered via the USB external hub.
This test imho is particularly interesting because it show something unexpected to me, the yellow box shows the HDD test while the blue box shows the SSD test.
As you can see the idle power consumption is not that different between the two drives (~2.7W), and that’s shocked me because I thought the SSD would be much more energy efficient and less power hungry. If we move to the stress test we can se a huge difference between the two, and that’s what I was expecting to see.
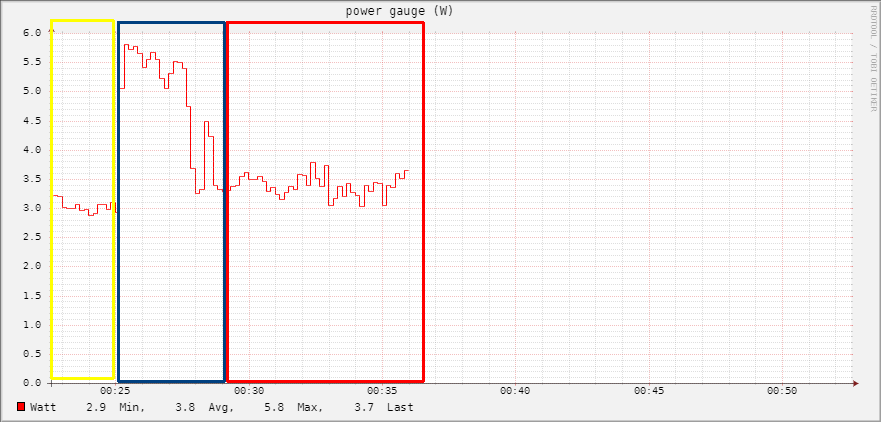
And finally we can see how the application load really impact on the power consumption.
For this test I measured only the Pi power consumption without SSD or HDD, in the first section (marked in the yellow box) you can see the Pi consumption on idle with only the basic OS (Debian 11) running on it, then I started all the application I usually run on it, all together (check the spike in the blue box), then finally the Pi with all the services running on it (red box).
As you can see there’s no such difference between an idle system with basically no services running on it, and the system with all the services I mentioned at the beginning running on it.
Obviously we’re talking about a home server solution, with basically one user and a few hosted sites (but we’re still talking about small WordPress sites with a few Matomo instances and not a lot of visitors)
I hope this will be helpful if you’re thinking about buying a Raspberry Pi as your own home server.