26/06/2025
Raspberry PI 5 NVMe upgrade
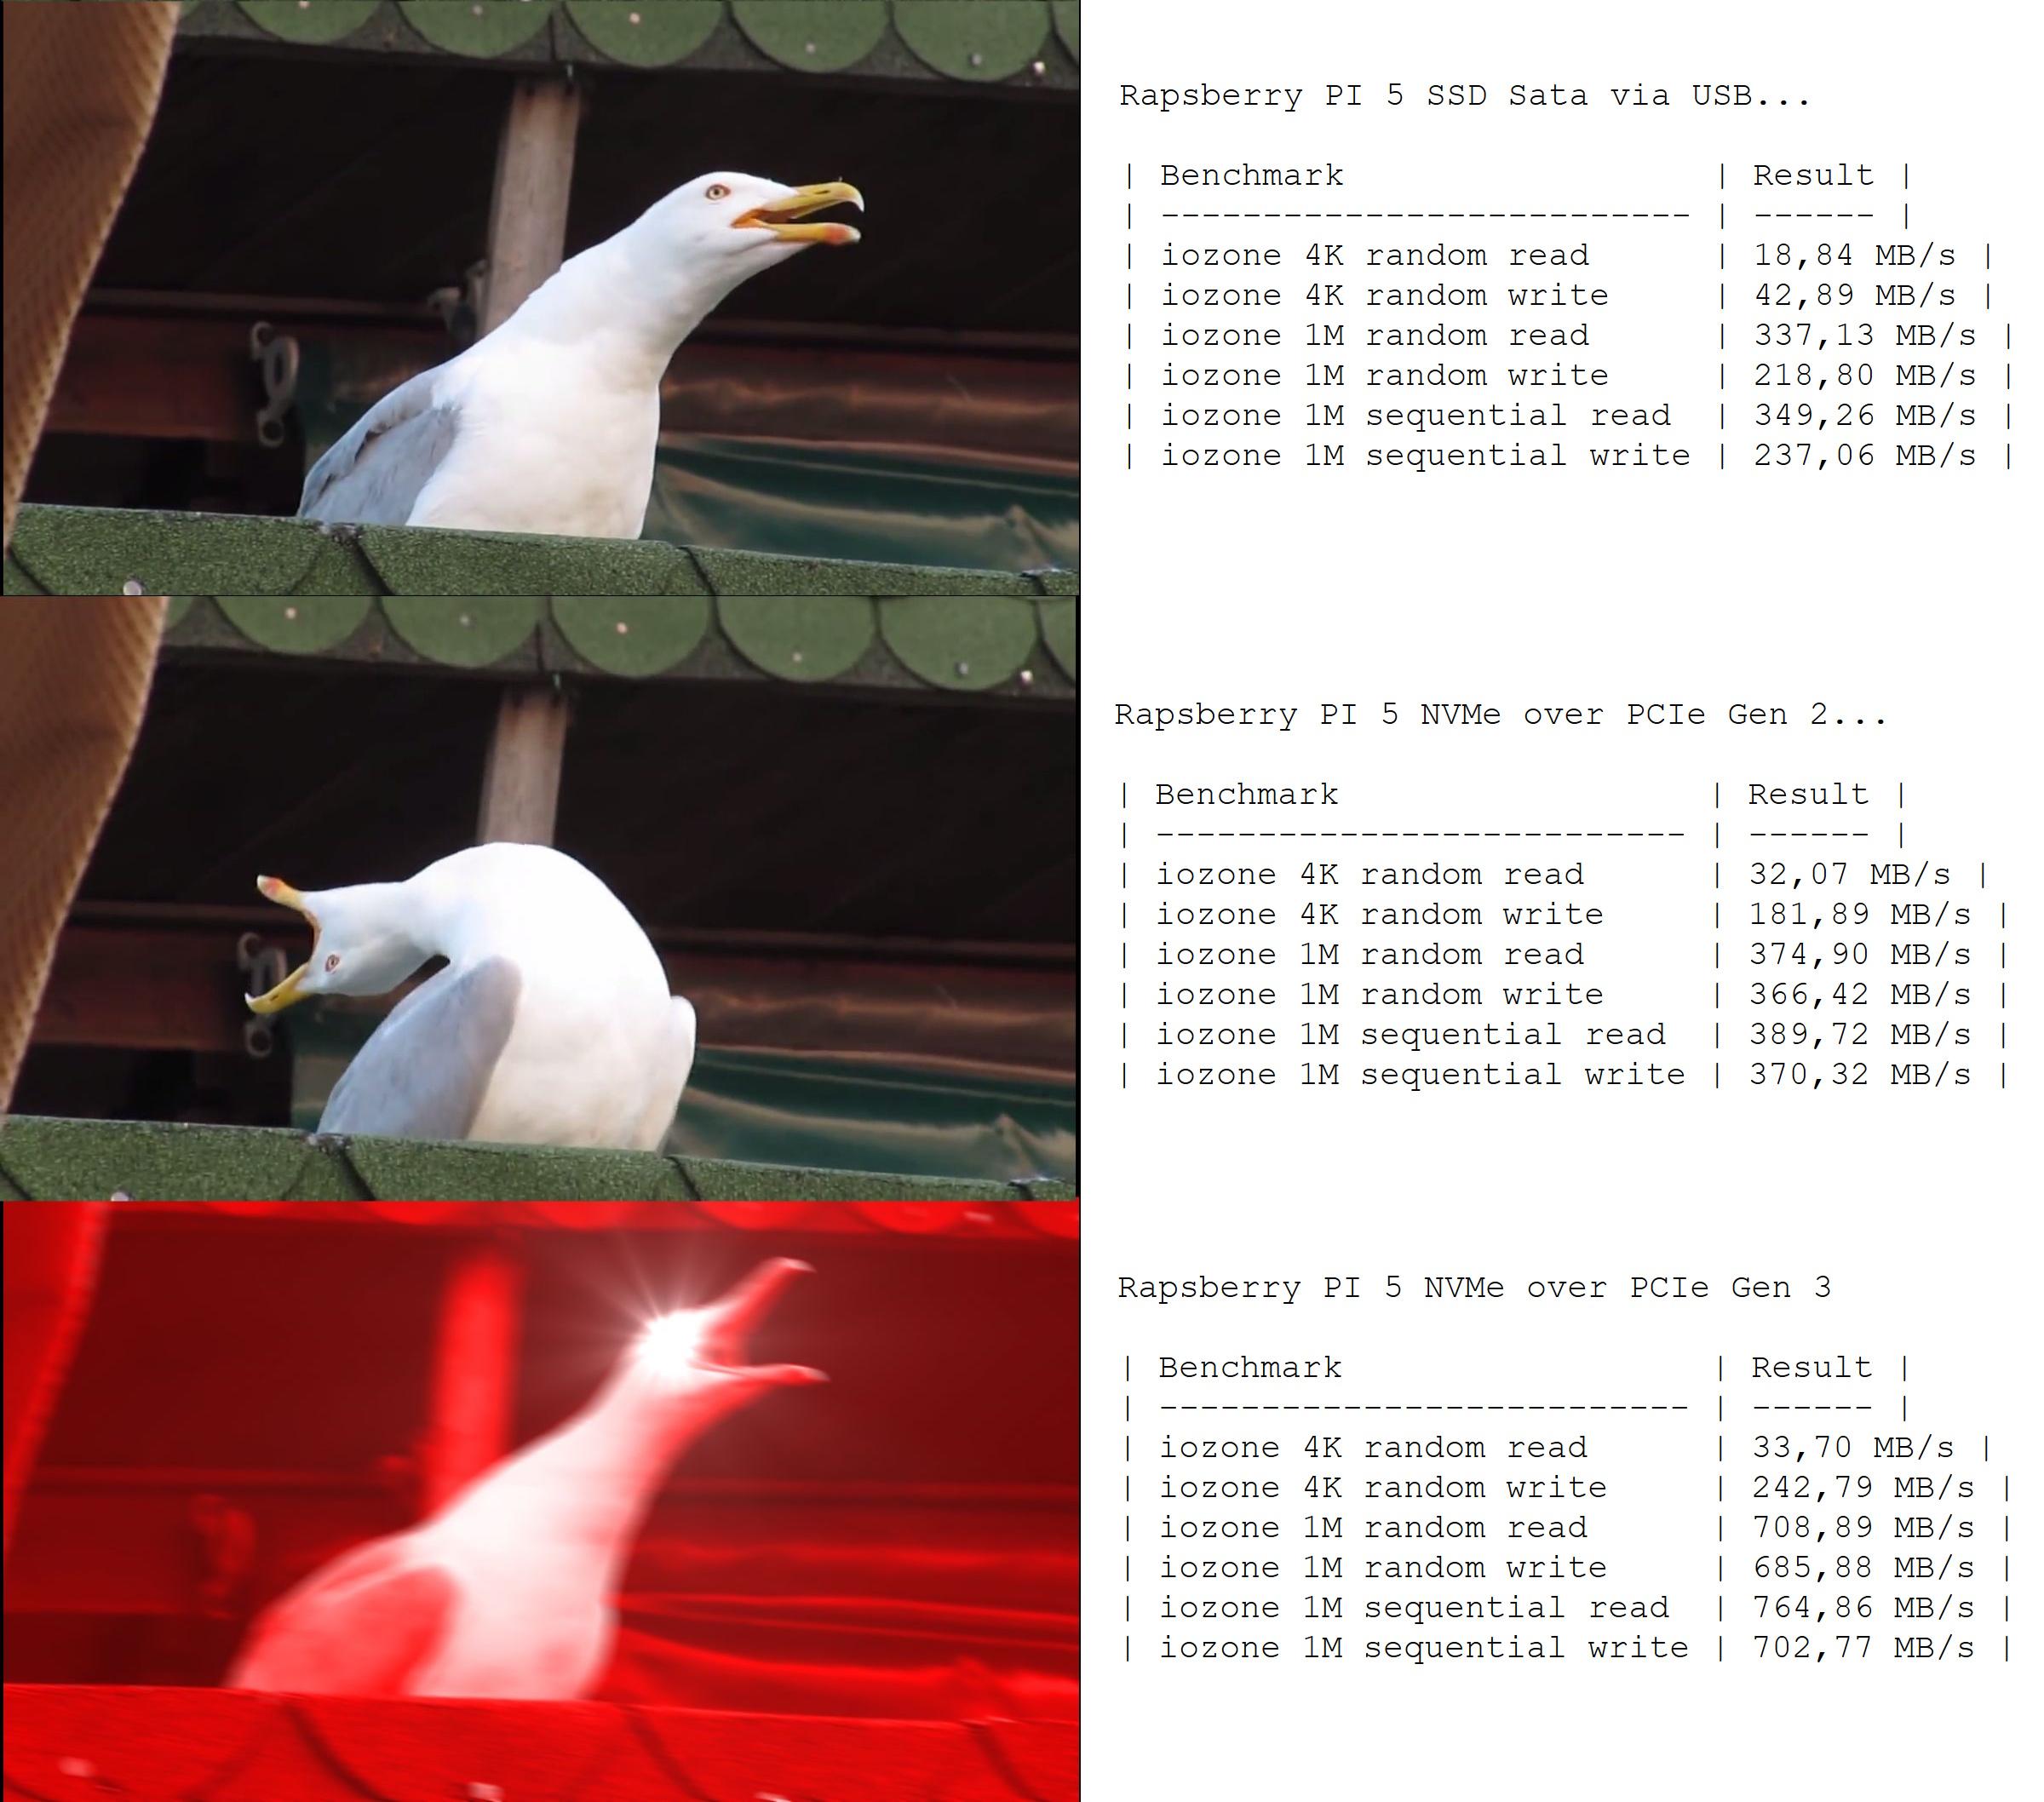
I just switched from my previous 1TB SATA SSD over USB to a new NVMe 2TB drive via PCIe slot on my Raspberry PI 5 home server.
I have to use a meme because I can’t express how fast and responsive it is… :P


I just switched from my previous 1TB SATA SSD over USB to a new NVMe 2TB drive via PCIe slot on my Raspberry PI 5 home server.
I have to use a meme because I can’t express how fast and responsive it is… :P
I love Bookstack, actually I think it’s one of the best wiki project existing.
It’s well documented, it works like charm, the developer is very active (and he’s also a very kind person, which has nothing to do with the software, but it’s always a pleasure interact with him) and it has very nice features:
It also works perfectly fine in a docker container, technically the official project do not offer a container image, but there are two groups building them and they’re referred directly in the official documentation.
Recently I started to sort things out on my beloved Raspberry PI 5, in particular I’m moving services so I can reverse proxy them on a single Apache httpd instance (you know I still love Apache :D ), today I moved around Bookstack, in particulare I did two things:
On my environment I’m using the LinuxServer.io docker image, so check the project site for details, and also I’m using docker compose, if you’re not familiar with it start using it for Reorx’s sake.
First of all take a damn backup, it’s mandatory.
Seriously I’m not joking.
Stop the containers
cd /data/docker/bookstack ; docker compose down
Backup files with a simple tar, restic, kopia, whatever you want, but DO IT!
cd /data/docker/ ; tar -cpzf /backup/bookstack-backup.tar.gz bookstack
This process is documented on the Bookstack documentation (LINK), but still I decided to mention it because the procedure is a little bit different on a docker container, so it’s worth spent a few words about it.
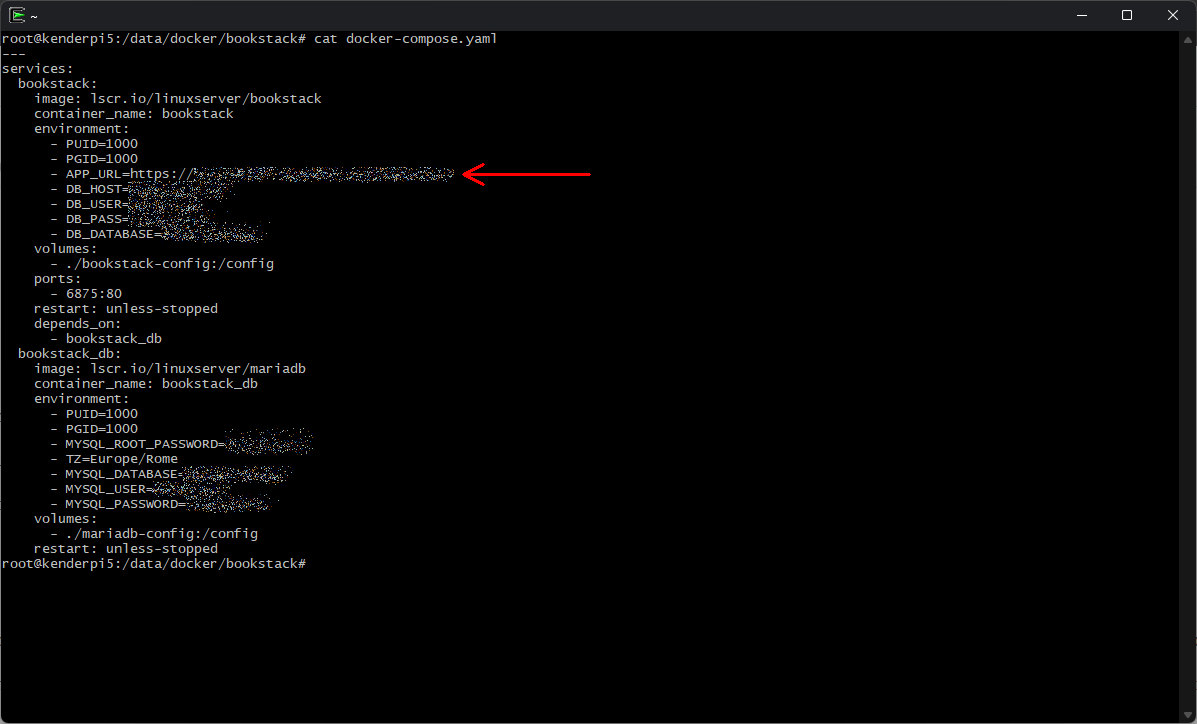
First of all you have to change the APP_URL configuration variable, in case of a docker container it’s enough to change the environment variable on the docker-compose.yaml file, so open the file and change the variable to the new url
Now you must replace the old url from the database record with the new one using the bookstack:update-url command, in case of a docker container you must identify where’s the Laravel framework artisan file and launch it accordingly to the documentation.
docker exec -it bookstack php /app/www/artisan bookstack:update-url https://site.domain.tld https://newsite.domain.tld
After that clear the cache using
docker exec -it bookstack php /app/www/artisan cache:clear
Restart the docker container to change the environment variable you previously changed with the new url.
cd /data/docker/bookstack ; docker compose down ; docker compose up -d
Done, now your Bookstack instance should be reachable to the new url.
This change is a little bit tricky, because it involves some webserver changes.
First of all you must repeat the same process used for changing the url hostname of your Bookstack instance, this time including the context you want to use (for example /bookstack ).
Let’s quickly review the steps:
1) Change the APP_URL environment variable in the docker-compose.yaml (APP_URL=https://newsite.domain.tld/bookstack in this case)
2) Replace the url in the database using the bookstack:update-url
docker exec -it bookstack php /app/www/artisan bookstack:update-url https://newsite.domain.tld https://newsite.domain.tld/bookstack
3) Clear Bookstack cache
docker exec -it bookstack php /app/www/artisan cache:clear
4) Restart the docker container to change the environment variable you previously changed with the new url.
cd /data/docker/bookstack ; docker compose down ; docker compose up -d
Now you must review the webserver configuration inside your docker container, in case of the LinuxServer.io container there’s a nginx instance running inside the container, you can fine its configuration inside the /config/nginx/ directory inside the container.
If you followed the LinuxServer.io recommendations the /config directory should be a persistent volume (or a persistent path on your docker host), so any changes in the nginx configuration files should not be lost in case of a container restart.
In my case the config persistent volume is located in the /data/docker/bookstack/bookstack-config directory, so the nginx configuration is located in the file /data/docker/bookstack/bookstack-config/nginx/site-confs/default.conf.
Apply this patch
wget https://tasslehoff.burrfoot.it/pub/bookstack-nginx.patch ; \
patch /data/docker/bookstack/bookstack-config/nginx/site-confs/default.conf < bookstack-nginx.patch
Reload nginx configuration
docker exec -it bookstack nginx -s reload
Done, now your Bookstack instance should work at the new url https://newsite.domain.tld/bookstack
It’s been a while since a started using a Raspberry Pi 4 as a home server instead of my old Banana PI, yesterday I was following a interesting thread on a forum regarding RPi5 compared to some x64 boards, specially those using Intel N100 processor.
This thread made me remember the good old days when I started using my ancient Via Epia board and I won a forum competition for the home server with the lowest possible power consumption.
Now seems like people complains about RPi because of its cost and it’s performance/power ratio compared to other boards, like those using Intel N100, and this pushed me to check out my beloved Pi power consumption, let’s bust some myths!
Before starting let me roughly explain how I use my RPi4, just to clarify that it’s not an idle server stuck in a closet to absorb electricity:
Not let’s take a look to my setup:
To measure power consumption I used a Shelly Plug and an external self powered USB hub for measuring each usb drive.
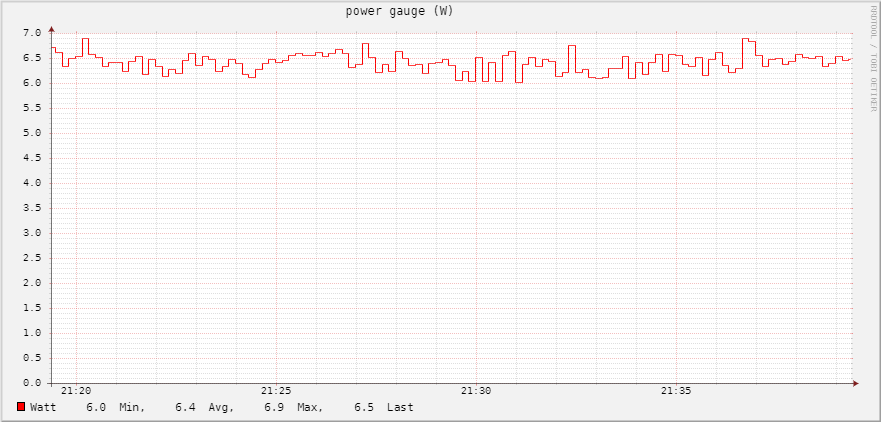
This is my RPi4 power consumption on idle with the two usb drives, as you can see we’re on a 6.4W average, not bad…
Here is the Pi with only the SSD, around 4.7W

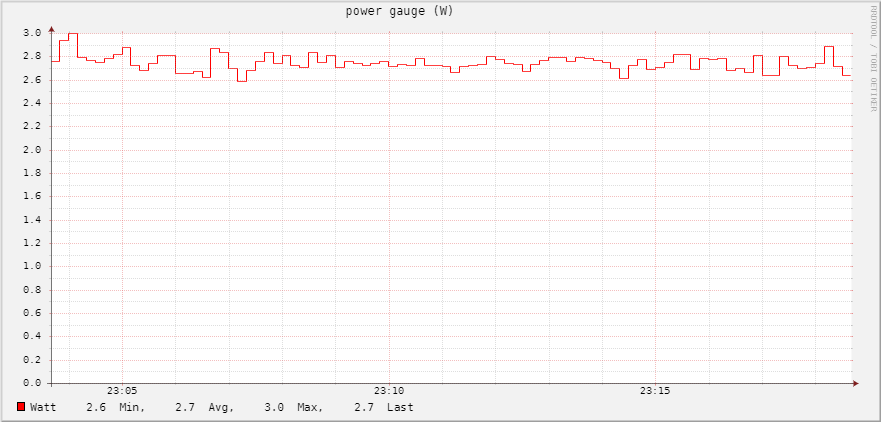
And here’s the mechanical HDD by itself at around 2.7W
As you can see the sum of the Pi+SSD (4.7W) and the HDD (2.7W) is over the average power consumption of the three devices all together (7.4W vs 6.4W), and that’s pretty normal, attaching the HDD directly to the Pi and power it via Pi’s usb ports is more efficient, and does not have the overhead of the usb external hub (which probably is less efficient as the Pi and its PSU).
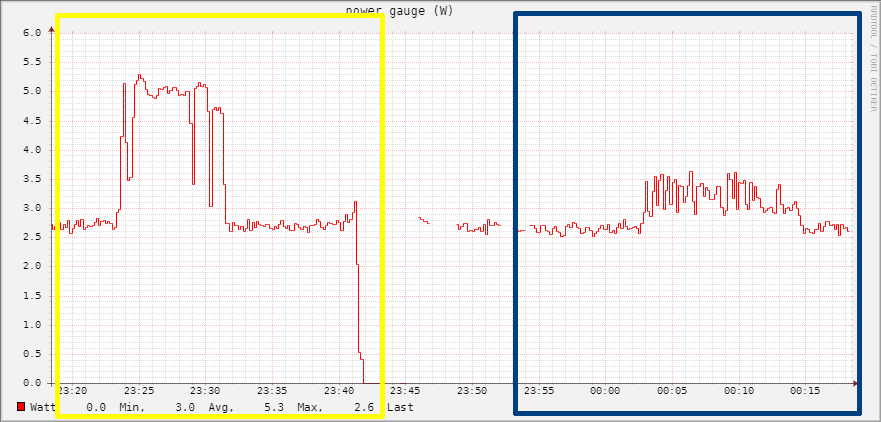
Let’s continue with the hard drives, in this test I measured the power consumption of the SSD and the HDD powered via the USB external hub.
This test imho is particularly interesting because it show something unexpected to me, the yellow box shows the HDD test while the blue box shows the SSD test.
As you can see the idle power consumption is not that different between the two drives (~2.7W), and that’s shocked me because I thought the SSD would be much more energy efficient and less power hungry. If we move to the stress test we can se a huge difference between the two, and that’s what I was expecting to see.
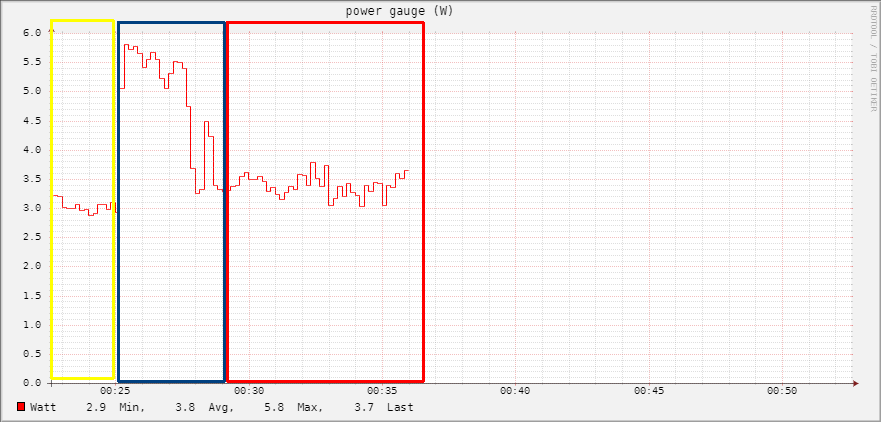
And finally we can see how the application load really impact on the power consumption.
For this test I measured only the Pi power consumption without SSD or HDD, in the first section (marked in the yellow box) you can see the Pi consumption on idle with only the basic OS (Debian 11) running on it, then I started all the application I usually run on it, all together (check the spike in the blue box), then finally the Pi with all the services running on it (red box).
As you can see there’s no such difference between an idle system with basically no services running on it, and the system with all the services I mentioned at the beginning running on it.
Obviously we’re talking about a home server solution, with basically one user and a few hosted sites (but we’re still talking about small WordPress sites with a few Matomo instances and not a lot of visitors)
I hope this will be helpful if you’re thinking about buying a Raspberry Pi as your own home server.
Mi rendo conto solo ora che è passato quasi un secolo da quando presentai su questo blog il mio leggendario server domestico basato su Via Epia.
Da allora la mia attenzione in questo campo è aumentata in modo esponenziale e dopo elocubrazioni varie ho varcato la soglia del mondo ARM con Raspberry PI.
Sia chiaro, considero Raspberry PI un progetto STUPENDO e RIUSCITISSIMO, sia dal punto di vista tecnico che di comunicazione, tant’è che ne ho comprati ben due e l’ultimo di questi mi sta fedelmente servendo da parecchio tempo.
Ciò nonostante le limitazioni di Raspberry PI sono palesi, tecnicamente e anche eticamente (etica informatica? Già, perchè no?).
Tecnicamente parlando il SOC di cui è dotato è parecchio datato e poco potente, ottimo per tantissime attività ma dalle performance scarse in molti campi (ad esempio come nas o backup repository, come webserver o application server).
Inoltre bisogna ammettere che il sottosistema di I/O è progettato piuttosto male, tant’è che una delle più frequenti cause di problemi è proprio il controller USB su cui ricadono sia la scheda di rete (a 100 Mbps) che le porte USB, unica connessione disponibile per storage capiente e alternativo alla scheda SD.
Io stesso sono stato costretto a pensionare il mio primo esemplare a causa del controller USB che una volta posto sotto stress disconnetteva il device USB corrispondente al disco esterno da 2.5″ dove risiedono i miei file.
Dal punto di vista etico invece non posso fare a meno di notare la stridente contraddizione di un progetto che ha fatto della filosofia Open Source la sua bandiera, ma che di fatto è fortemente “closed”, tant’è che ad oggi non sono stati resi pubblici gli schemi dell’hardware stesso.
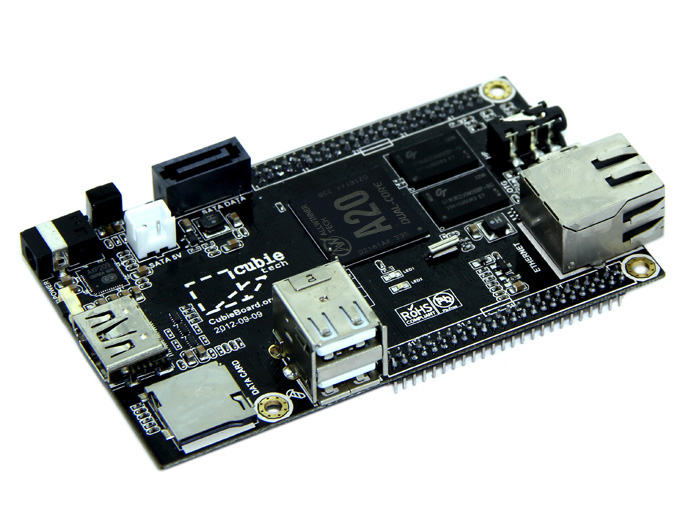
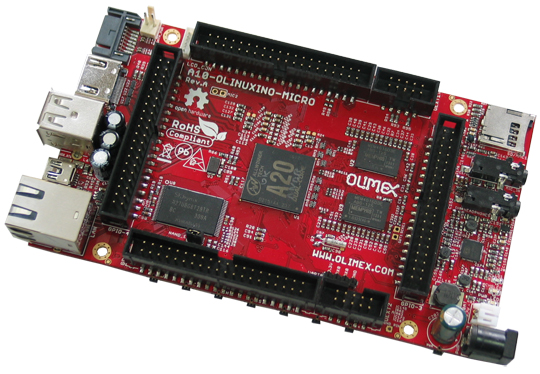
Visto il successo di questo progetto è bastato poco perchè nascessero molte iniziative simili, alcune con tutti i requisiti tecnici per surclassare Raspberry PI (una molto interessante ma dal costo esageratamente elevato è Cubietruck di cui avevo già parlato).
Per fortuna alcune di queste si sono consolidate, hanno creato una discreta comunità di utenti e, cosa che non guasta mai, hanno proposto le loro soluzioni a prezzi accessibili; tra queste le principali sono Banana PI e le board Olimex (delle quali la più interessante ad oggi è la Lime2).
Tecnicamente si tratta di due progetti molto simili, basati entrambi su SOC ARM Cortex-A7 dual-core (Allwinner A20), 1GB di ram, controller SATA, scheda di rete gigabit ethernet e prezzo tutto sommato allineato (circa 45 euro); rispetto a Raspberry PI la potenza computazionale e le performance di I/O sono sbalorditive, e nonostante questo l’assorbimento è persino più basso.
Anche eticamente le due schede sono simili, di entrambi infatti sono disponibili i sorgenti e tutta la documentazione.
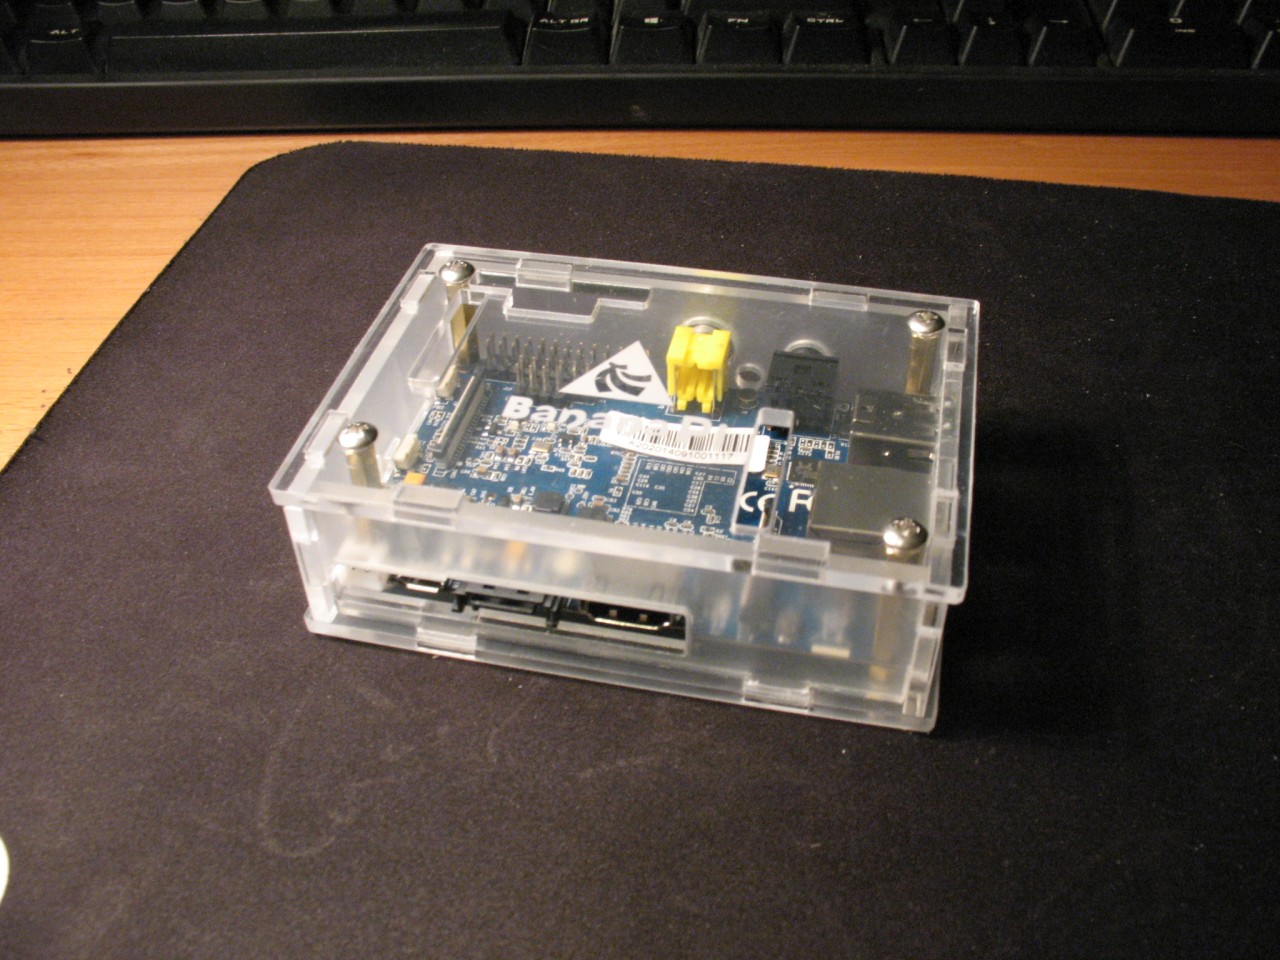
Come è intuibile dal titolo ho scelto Banana PI, ero molto incuriosito dal prodotto Olimex ma la disponibilità da Amazon mi ha fatto propendere per il concorrente; oggi poi mi è pure stato recapitato il case in plexiglass con relativo cavo SATA (con alimentazione integrata), per cui quale migliore occasione per immortalare questo magico scatolino?
A breve mi aspetta una colossale migrazione (lavorativa), appena avrò finito e sarò riuscito a tirare un po’ il fiato procederò con la migrazione (domestica) del muletto al nuovo Bananone :)
Dalle analisi degli accessi noto con grande piacere che c’è sempre grande interesse riguardo ai server domestici, se preferite “muletti”.
Di recente il mio storico Epia 5000A ha subito un brutto colpo, una serie di guasti allo storage l’hanno costretto ad un down forzato, vista poi la difficoltà a reperire hard disk PATA sono stato costretto ad acquistare un adattatore IDE-SATA il quale a sua volta mi ha costretto a ritrasferire l’Epia nel primo storico case a causa di problemi di spazio (fisico stavolta).
Naturalmente nessun dato è stato perso grazie ai rigorosi piani di backup che ho implementato nel tempo, questa pausa però mi ha spinto a riflettere un po’ sul futuro del mio server domestico.
In tal senso l’esperienza con Raspberry PI è stata illuminante, le possibilità software sono pressochè le stesse del mio Epia x86, l’assorbimento è di gran lunga inferiore (meno di 1/5 in idle, addirittura circa 1/9 a pieno carico), la temperatura da dissipare pressochè trascurabile, gli ingombri ridottissimi, le performance simili.
L’unico aspetto limitante di Raspberry PI è lo storage, dover ricorrere ad un disco usb alimentato mediante un hub usb rappresenta un vero scoglio, o per lo meno trasformerebbe quello che oggi è un bel case ordinato e compatto in una foresta di mangrovie di cavi.
Una soluzione ci sarebbe, si tratta del progetto Fairywren, una mainboard mini-itx a cui connettere Raspberry PI con tutto l’occorrente per storage, rete, alimentazione, hub usb interno, un piccolo gioiellino che sta nascendo su Kickstarter e che rappresenterebbe una vera manna per chi come me vorrebbe usare Raspberry come server domestico.

Frequentando vari forum però mi è stato giustamente fatto notare che al di la dell’hype generato dal progetto Raspberry PI è basato su un SoC relativamente antiquato e piuttosto limitato in termini di risorse, idem per quanto riguarda progetti simili tipo BeagleBone.
Così sono venuto a conoscenza di altri progetti molto più interessante, magari meno rivolti alla ricerca o alla sperimentazione ma dotati di più risorse, insomma il perfetto punto di contatto tra le esigenze server e i vantaggi delle architetture ARM.
Due hanno attirato la mia attenzione, entrambi dotato di SoC Cortex A20 dual core, entrambi dotati di 1GB di ram DDR3 e un canale SATA, si tratta di:
Entrambi ottimi progetti, simili dal punto di vista hardware ma differenti come approccio e filosofia di base.
Cubieboard 2 ha al suo attivo una comunità abbastanza diffusa, un forum piuttosto popolato e un layout piuttosto compatto, OLinuXino A20 è meno diffuso, un layout più “affollato”, una comunità meno popolosa ma è dotato di un gran numero di interfacce GPIO (quindi molto più indicato per la ricerca e applicazioni pratiche, un approccio simile a Raspberry PI per intenderci), entrambi sono progetti open hardware.
Di per se sarei fortemente attratto da entrambi questi progetti, l’unico aspetto che mi lascia dubbioso è il layout di questi sistemi, bellissimo e compatto ma difficilmente integrabile con un case ordinato e altrettanto compatto, insomma se dovessi utilizzarli mi ritroverei con una foresta di mangrovie di cavi come con Raspberry PI
Quasi in risposta alle mia suppliche il team di Cubieboard ha annunciato un nuovo progetto open hardware chiamato Cubietruck che prevede:
ma soprattutto grande attenzione al layout, tanto da essere sovrapposto a quello di un hard disk da 2.5″, e addirittura pubblicando un prototipo di case veramente fantastico.
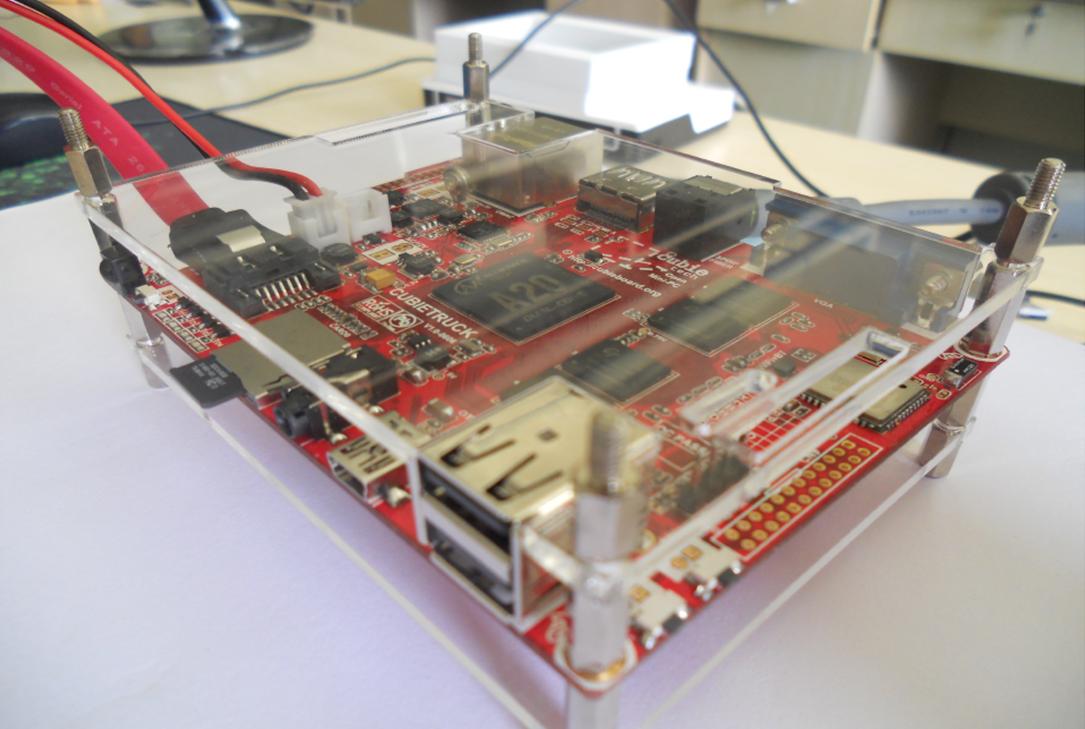
Mio al DAY1!!!
[EDIT]
Good news! Sembra che la produzione di Cubietruck stia per iniziare! Yuppi!!!! :)