27/10/2024

Change Bookstack url and context

I love Bookstack, actually I think it’s one of the best wiki project existing.

It’s well documented, it works like charm, the developer is very active (and he’s also a very kind person, which has nothing to do with the software, but it’s always a pleasure interact with him) and it has very nice features:

  • a nice and responsive design
  • drafts autosave
  • MFA out of the box
  • diagrams.net integration

It also works perfectly fine in a docker container, technically the official project do not offer a container image, but there are two groups building them and they’re referred directly in the official documentation.

Recently I started to sort things out on my beloved Raspberry PI 5, in particular I’m moving services so I can reverse proxy them on a single Apache httpd instance (you know I still love Apache :D ), today I moved around Bookstack, in particulare I did two things:

  1. change Bookstack hostname (for example from https://site.domain.tld to https://newsite.domain.tld )
  2. make Bookstack work under a specific url context (for example https://site.domain.tld/bookstack instead of https://site.domain.tld ).

On my environment I’m using the LinuxServer.io docker image, so check the project site for details, and also I’m using docker compose, if you’re not familiar with it start using it for Reorx’s sake.

Backup

First of all take a damn backup, it’s mandatory.

Seriously I’m not joking.

Stop the containers

cd /data/docker/bookstack ; docker compose down

Backup files with a simple tar, restic, kopia, whatever you want, but DO IT!

cd /data/docker/ ; tar -cpzf /backup/bookstack-backup.tar.gz bookstack

Change Bookstack hostname

This process is documented on the Bookstack documentation (LINK), but still I decided to mention it because the procedure is a little bit different on a docker container, so it’s worth spent a few words about it.

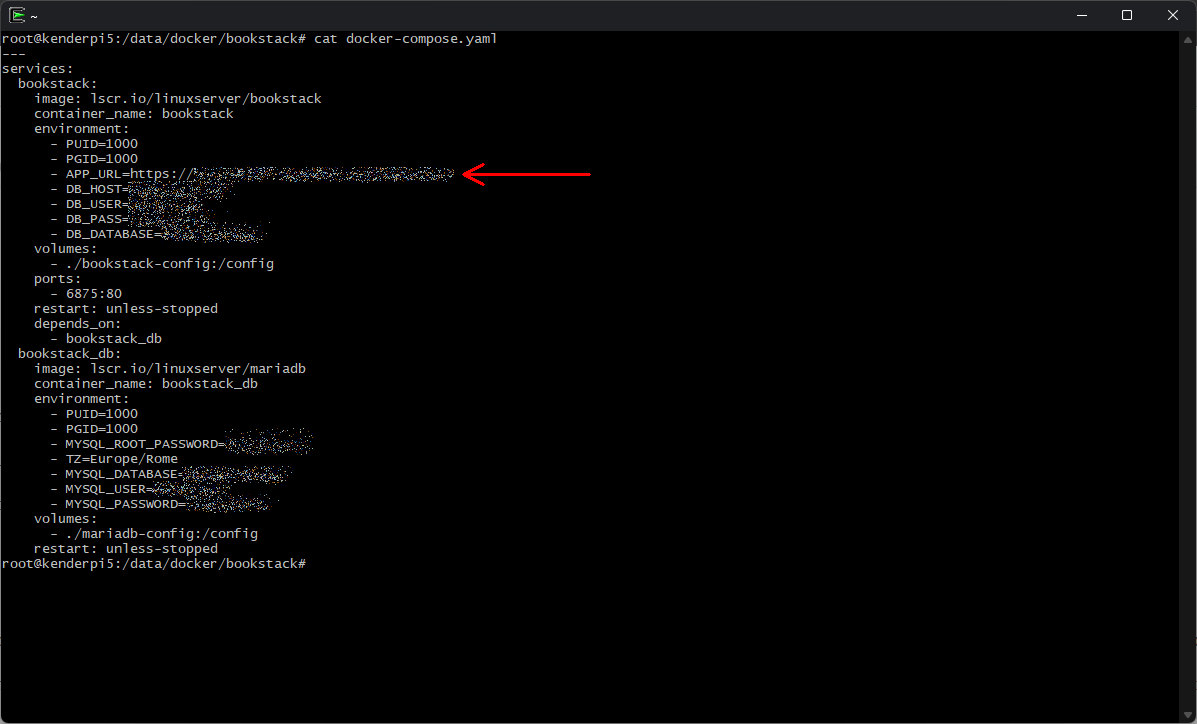
First of all you have to change the APP_URL configuration variable, in case of a docker container it’s enough to change the environment variable on the docker-compose.yaml file, so open the file and change the variable to the new url

Now you must replace the old url from the database record with the new one using the bookstack:update-url command, in case of a docker container you must identify where’s the Laravel framework artisan file and launch it accordingly to the documentation.

docker exec -it bookstack php /app/www/artisan bookstack:update-url https://site.domain.tld https://newsite.domain.tld

After that clear the cache using

docker exec -it bookstack php /app/www/artisan cache:clear

Restart the docker container to change the environment variable you previously changed with the new url.

cd /data/docker/bookstack ; docker compose down ; docker compose up -d

Done, now your Bookstack instance should be reachable to the new url.


Change Bookstack root context

This change is a little bit tricky, because it involves some webserver changes.

First of all you must repeat the same process used for changing the url hostname of your Bookstack instance, this time including the context you want to use (for example /bookstack ).

Let’s quickly review the steps:

1) Change the APP_URL environment variable in the docker-compose.yaml (APP_URL=https://newsite.domain.tld/bookstack in this case)

2) Replace the url in the database using the bookstack:update-url

docker exec -it bookstack php /app/www/artisan bookstack:update-url https://newsite.domain.tld https://newsite.domain.tld/bookstack

3) Clear Bookstack cache

docker exec -it bookstack php /app/www/artisan cache:clear

4) Restart the docker container to change the environment variable you previously changed with the new url.

cd /data/docker/bookstack ; docker compose down ; docker compose up -d

Now you must review the webserver configuration inside your docker container, in case of the LinuxServer.io container there’s a nginx instance running inside the container, you can fine its configuration inside the /config/nginx/ directory inside the container.

If you followed the LinuxServer.io recommendations the /config directory should be a persistent volume (or a persistent path on your docker host), so any changes in the nginx configuration files should not be lost in case of a container restart.

In my case the config persistent volume is located in the /data/docker/bookstack/bookstack-config directory, so the nginx configuration is located in the file /data/docker/bookstack/bookstack-config/nginx/site-confs/default.conf.

Apply this patch

wget https://tasslehoff.burrfoot.it/pub/bookstack-nginx.patch ; \
patch /data/docker/bookstack/bookstack-config/nginx/site-confs/default.conf < bookstack-nginx.patch

Reload nginx configuration

docker exec -it bookstack nginx -s reload

Done, now your Bookstack instance should work at the new url https://newsite.domain.tld/bookstack

09/05/2024

NVCleaninstall

For the series “Thing I can’t live without” (or maybe “dear stupid mega corporate, this is how you should make your software setup”) I would like to suggest NVCleaninstall.

I have to admit I’m an Nvidia hater since the good old 3dfx days, but sometimes it happens to install of update drivers on other people’s computer that sadly use Nvidia GPUs.

NVCleaninstall is the only way to install or update Nvidia GPU drivers without installing bloatware and useless services, it’s simple to use, it’s clean and straightforward and can automatically check when new drivers are release, it’s a small gem every Nvidia user should know and use.

You’re welcome.


02/03/2024

Using KeeAgent with Cygwin OpenSSH

As I said in the previous post I’m in love with Cygwin… but I’m also in love with Keepass… and I also live with ssh… so how to make my life easier?

The answer is simple: KeeAgent

KeeAgent is a Keepass plugin that can work as a ssh agent, in this way:

  1. you can save you ssh private keys in a safe and encrypted Keepass database –> NO MORE PRIVATE KEYS ON FILESYSTEM
  2. you don’t have to deal with ssh private keys passphrases, because they’re stored in the Keepass entries where you’ll save private keys –> NO MORE UNENCRYPTED PRIVATE KEYS
  3. you can easily retrieve public keys to authorize hosts access without searching like a hound on your filesystem, in a couple of clicks KeeAgent will provide them

Apparently the setup of all this thing may seem complex, in reality it’s quite simple:

  1. download and install KeeAgent from https://github.com/dlech/KeeAgent/releases
  2. in KeeAgent options (Tools -> Options -> KeeAgent) put this string into “Cygwin/MSYS Integration” Path
    %UserProfile%/.keeagent.sock
  3. restart Keepass and check if there’s the file .keeagent.sock in your home and it’s a socket file
    file ~/.keeagent.sock
  4. export SSH_AUTH_SOCK variable and put it on your .bashrc file, the value of the variable should be the path of the socket file you set at the point number 2.
    echo "export SSH_AUTH_SOCK=~/.keeagent.sock" >> ~/.bashrc
  5. make sure you have installed Cygwin OpenSSH and you’re not using Windows ssh

The setup is complete, now you only have to create key entries in your Keepass database, attach private key files, fill the password field and enable those entries to be loaded with KeeAgent.

For more details check the super clear KeeAgent documentation.

17/02/2024

Windows home as Cygwin home

Working as a GNU/Linux sysadmin means working all day long on a terminal, it doesn’t matter if you’re dealing with a server, a container or a Kubernetes cluster, and for me terminal means Cygwin.

Microsoft made huge changes since Windows 10 to make it easy to work with GNU/Linux on a Windows workstation, think about OpenSSH available by default or WSL, but for me Cygwin is still the 1st choice, no virtualization, no  WSL network issues, (almost) all the GNU/Linux utils available, fast and native to Windows.

But sometimes having two home directories (one for Cygwin, one for your Windows user) is not convenient at all… but there’s a solution for that, it’s easy and it’s fast and do not involve any workaround or symlinks, you can tell Cygwin to use the Windows home directory as a Cygwin home.

For doing it you simply have to edit the /etc/nsswitch.conf file and change the db_home variable, using as value “/%H”, here’s the result:

tas@tas ~
$ grep ^db_home /etc/nsswitch.conf
db_home: /%H

The next terminal you’ll open will have its home into “C:\Users\<user>” or if you are a Cygwin lover “/cygdrive/c/Users/<user>” ;)

18/09/2023

Windows 11 is PITA

Finally after 11 years with my old gaming PC I made it! I finally got a new build with a brand new Ryzen 5 CPU!

Maybe I’ll make a post about it, specially for some power consumption considerations, but now it’s PITA time, to be precise it’s Windows 11 PITA time.

Yes, I installed Windows 11 on this new pc, Windows was an obvious choice for a gaming pc, and Windows 11 was the only choice that made sense for a new configuration.

But yes… Windows 11 is a PITA (for those who don’t know this means “Pain In The Ass”), there are many reasons for that, maybe I’ll post about them while I’ll encouter them, but for now let’s start with the first PITA example: default app selection for a certain type of file.

I know it’s not a new thing, also Windows 10 had this problem, but you can solve it easily with a few click here and there, but Windows 11 added a new layer of complexity on top of that.

Right now I spent half an hour finding how could I open PNG files by default with IrfanViewe (btw go to https://www.irfanview.net/ and install it, it’s the best image viewer and basic editor on the planet) because by default Windows 11 associate .png file with the Microsoft Photo app (which is really bad and slow compared to IrfanView).

The main problem is that the .png file are not listed in the default app (Microsoft Photo), same goes for .png file extention, and you can’t uninstall the Microsoft Photo app using the Windows Apps window.

But thanks to PowerShell and administrator rights you can do it.

  1. open PowerShell with administrator rights
  2. use “get-appxpackage *photos*” to get the details on the default app for photos
  3. use “get-appxpackage *photos* | remove-appxpackage” to uninstall the default app for photos.
  4. try to open a png file and select IrfanView as a default app.

« Post precedenti | Post successivi »