25/09/2025

Stalker 2… meh…

Ok, let’s talk about Stalker 2, and let’s immediately clear the elephant in the room… I’m not entirely fond of it.

I’m a Stalker fan since the first epic episode of this fantastic series of videogames came out, I played and finished several times:

  • Stalker: Shadow of Chernobyl
  • Stalker: Clear Sky
  • Stalker: Call of Pripyat

I repeat, I finished them SEVERAL TIMES…

On top of it I played SEVERAL TIMES the mods that I consider the best Stalker experience:

  • Stalker: Lost Alpha
  • Stalker: Anomaly

It’s a game I kept playing, over and over for the experience, for the lore, for the atmosphere, for its mechanics, and I’m not talking about decades ago, the last time I played Anomaly was just before I bought Stalker 2 this year.

As today I played 96 hours with Stalker 2, and honestly I don’t feel very interested in the game anymore.

From a technical point of view Stalker 2 is fantastic, it’s beautiful, it’s immersive, it’s… real, there’s no comparison with the old Stalker games on this aspect… but that’s the only positive aspect for me.

Stalker 2 combat seems like CoD or any frenzy FPS around, there’s almost no sneaking combat. Enemies keep spawning like crazy from nowhere and they spot you so far away that’s almost impossible to sneak behind them.

Same goes for mutants, they keep spawning from nowhere and without any logic imho, and any long range or silent sniper approach is basically useless, 90% of the times you have to grab an automatic gun and shoot ammo like a Serious Sam game.

NPCs are dumb as f..k, for 90% of them the only interaction you can get is “Talk to our boss”, 4,5% of them are available for a useless trading (you can’t trade any weapon with them) and 0,5% of them are NPCs that can give you missions… but not too many, one at the time, and between them you have to wait hours…

Even NPCs on key locations are basically useless, they can give you side missions… You finally think you’ve found some nice chain of missions, right? Sorry but no, they give you only a couple of missions and you’re done.

Merchants always sell the same things, no dynamic market while you progress in the game. 90% of weapons are basically useless, same goes with armors (those you find exploring or doing main missions are way way better).

Compared to Stalker mods like Lost Alpha and Anomaly weapons and armors upgrades are too few, and making money is so easy that basically you almost fully upgrade a weapon or armor as soon as you get it.

Speaking about making money, 99% of it came from selling weapons and armors to merchants, and that makes Stalker 2 something like a Death Stranding clone, because 90% of the times you end up crawling back to the nearest base struggling with stamina and slowly walking back to sell all the stuff you collected, because missions do not pay enough to repair your gear.

Finally main missions are beautiful and well done, but honestly it’s not enough for me, what always made Stalker games great for me has never been the main quest.

I’m not done yet with Stalker 2, I want to finish it, but I have to admit that each time I start it I found myself bored after 30 minutes of playing, I think I’ll go straight with main missions and ignore the rest… and maybe start a new game with Stalker Anomaly after that…

26/06/2025

Raspberry PI 5 NVMe upgrade

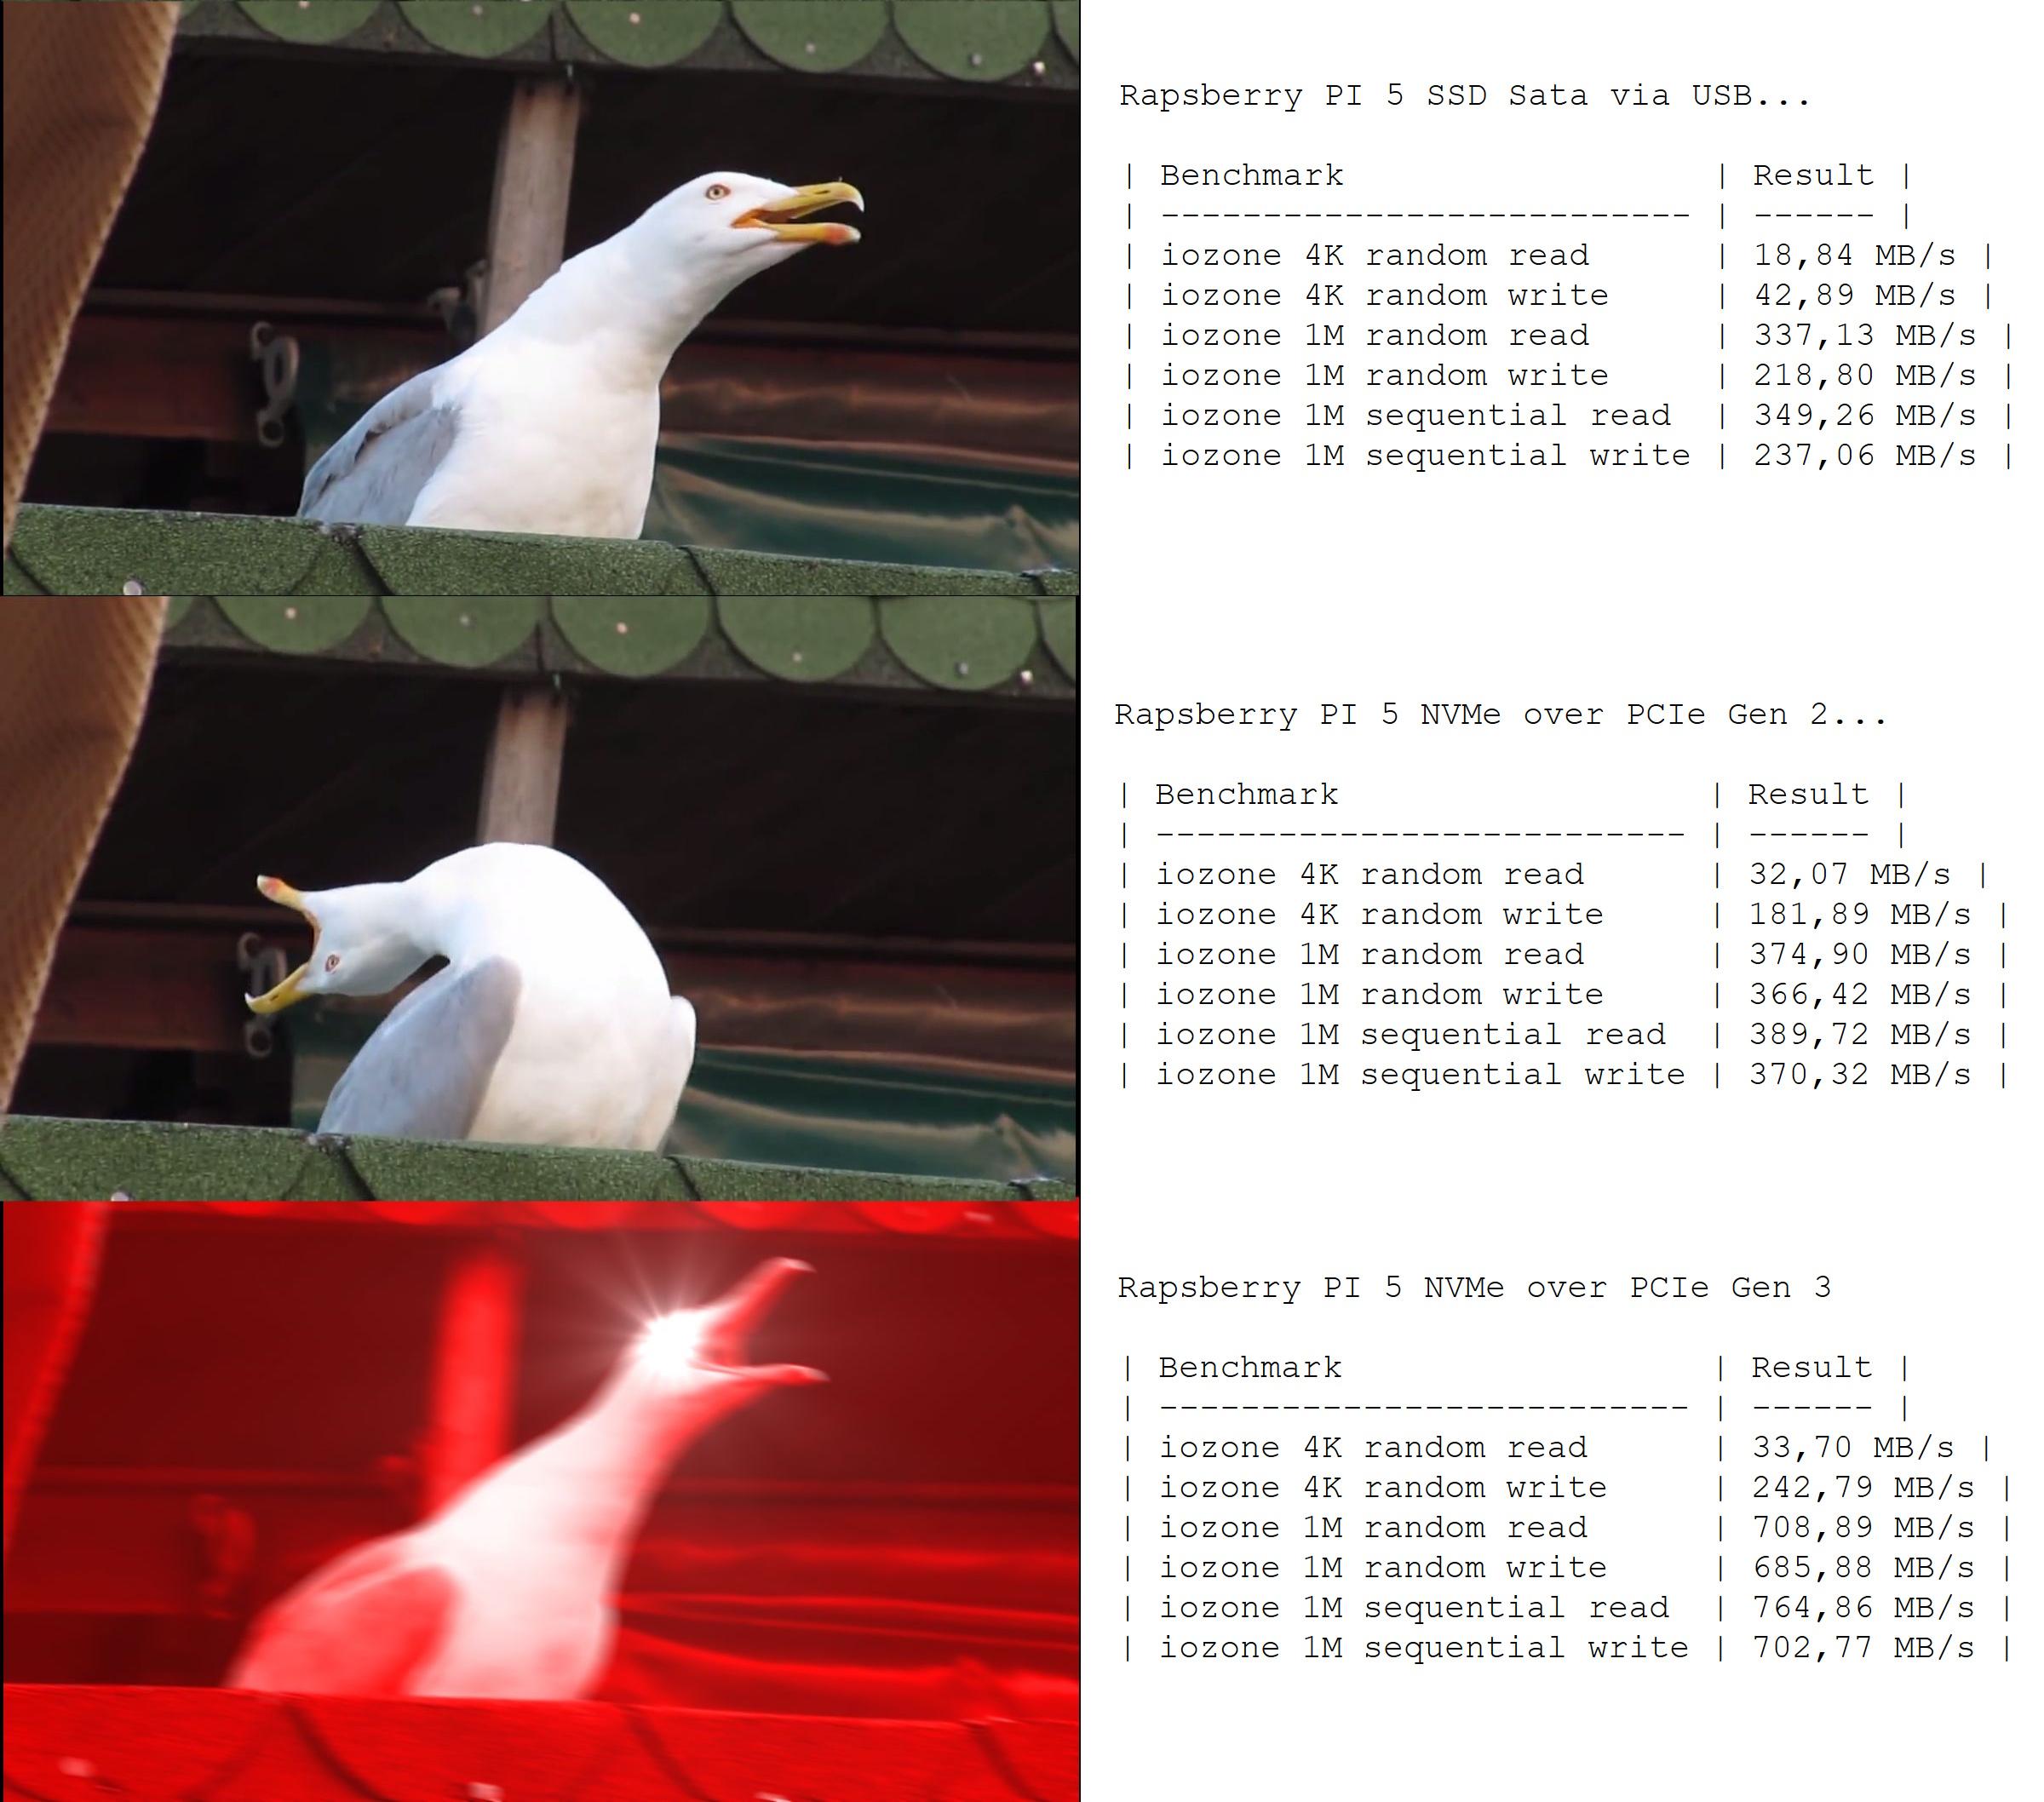
I just switched from my previous 1TB SATA SSD over USB to a new NVMe 2TB drive via PCIe slot on my Raspberry PI 5 home server.

I have to use a meme because I can’t express how fast and responsive it is… :P

08/03/2025

New Nagios project

I love Nagios, It’s the first monitoring service I started using and I loved it since the beginning.

I love it because no matter people say it’s simple, it’s reliable, it’s predictable, it’s simple to reproduce every check Nagios is doing and check yourself the results.

During the years I tried several other software, but I always found them inferior to Nagios, they were too bulky, too chaotic and too disorganized.

Since last autumn I finally was able to get back to my good old Nagios at work, I upgraded it, and I expand it to check new services, check the old ones in a better way and make the setup easier and easier.

I would like to start a new project to share how I use it, which checks I do, and hopefully show someone that the good old Nagios still has some arrows to shoot :)

Let’s start with a check I love and I never found in any other monitoring software: check_reboot_required

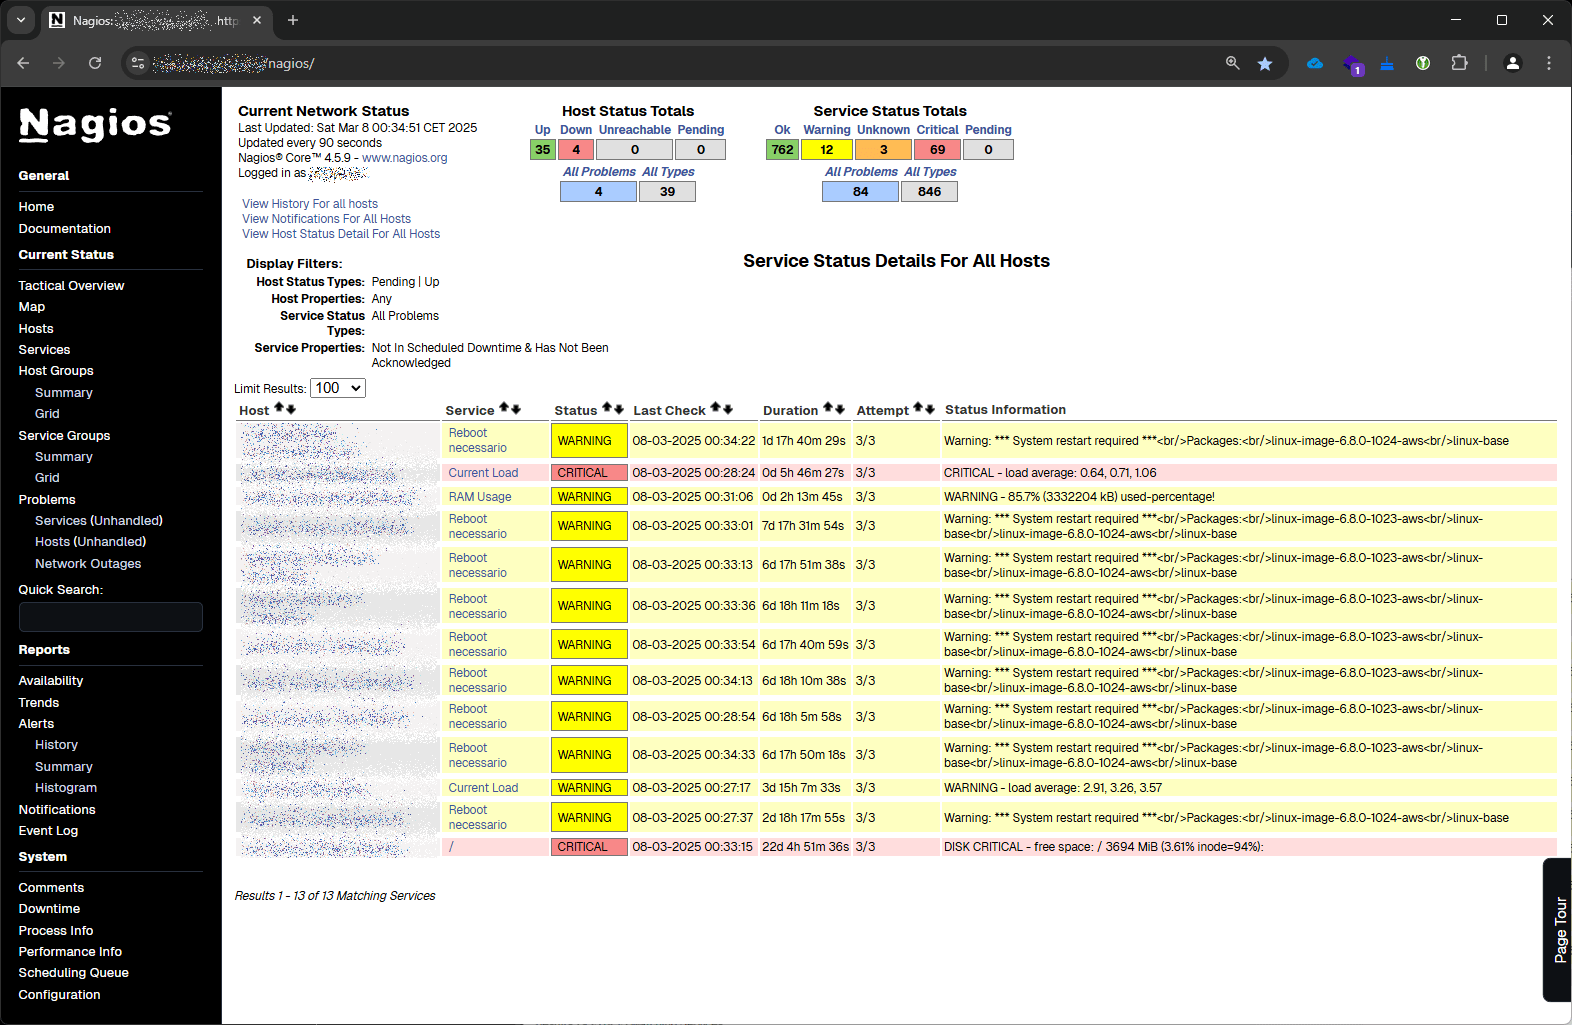
This check warns you if there’s a new kernel on you GNU/Linux machine that requires a reboot, it basically extract the running kernel version and the last kernel installed on the server, if they don’t match and the running kernel is older it turns on a warning alert, very simple and very effective to keep your server updated and secure.

Obviously this check is very important if you constantly run automatic updates (via yum-cron, dnf-automatic or unattended upgrades).

The check was written by Johan Ryberg and you can find it in his Github repo, It works perfectly fine on any RedHat based distribution and also on any Debian based distribution, I suggested a small change to make it works with Amazon Linux 2 also.

To use it you only have to

1. place the check_reboot_required file on the server you want to monitor in the Nagios plugins directory (/var/lib64/nagios/plugins on RHEL based distributions or /var/lib/nagios/plugins on Debian based distributions)

2. add this simple command to the nrpe config file (/etc/nagios/nrpe.conf) and restart the nrpe service.

command[check_reboot]=<NAGIOS PLUGINS PATH>/check_reboot_required -s $ARG1$

3. add the “Reboot required” service to your host in the Nagios server configuration

define service{
use generic-service
host_name server.domain.tld
service_description Reboot required
check_command check_nrpe!check_reboot!w
}

4. restart Nagios and enjoy


23/11/2024

Centos 8 multiple httpd instances

This is an old post I had in draft since… I don’t know, maybe years.

Anyway, CentOS 8 is old and out of support, but still I think running several instances of Apache httpd server through systemd can be useful today in other modern Linux distributions, so I think it’s time to clean up the drafts and publish it.

—————————————————

Recently a customer asked me to setup a webdav access to a vm to change some files inside a couple of java web applications deployed on a Tomcat instance.
My first choice was to configure the webdav servlet already available with Tomcat, which sounds like a nice and elegant solution, but that went wrong because webdav http methods were blocked by some Spring waf protection, and change the java applications for that was not an option (for various reasons I will not explain but not technical ones).

At this point I thought to create a new virtualhost for the webdav access, but in that case file ownership would be a problem, and running the frontend webserver with write permission on all the applications resouces was not a good idea.
The solution was simple, setup a new webserver running as tomcat user (Tomcat file owner) on a different port (and also only available on lan) but I found no documentation with some of the latest distros using systemd.
Yes I know, I could install nginx or another webserver, but running a new Apache configuration felt much more elegant to me.

First of all, create a new httpd systemd unit copying the old one with a new name

cp -v /usr/lib/systemd/system/httpd.service /usr/lib/systemd/system/httpd-dav.service

Copy the main httpd config file for the new webserver

cp -v /etc/httpd/conf/httpd.conf /etc/httpd/conf/httpd-dav.conf

Enable the new systemd unit to start at boot

systemctl enable httpd-dav.service

To check if it’s ok run this

systemctl list-unit-files | grep httpd-dav

Now you must edit the new systemd unit to use the new httpd-dav.conf file

systemctl edit httpd-dav.service

…and add this

[Service]
Environment=OPTIONS="-f /etc/httpd/conf/httpd-dav.conf"

Now you must edit the new httpd-dav.conf changing some basic directives to not overlap the main Apache configuration:
In my case I changed Listen PidFile, User, Group, ErrorLog, CustomLog, I removed “IncludeOptional conf.d/*.conf” and added a new virtualhost with mod_dav active, basic authentication, etc etc…
Adjust your Apache configurations as you need, but at least you have to change the Listen and PidFile directives to avoid conflicts with the other httpd process.

When you’re ready you only have to start it with

systemctd start httpd-dav.service

I hope this can be helpful.

27/10/2024

Change Bookstack url and context

I love Bookstack, actually I think it’s one of the best wiki project existing.

It’s well documented, it works like charm, the developer is very active (and he’s also a very kind person, which has nothing to do with the software, but it’s always a pleasure interact with him) and it has very nice features:

  • a nice and responsive design
  • drafts autosave
  • MFA out of the box
  • diagrams.net integration

It also works perfectly fine in a docker container, technically the official project do not offer a container image, but there are two groups building them and they’re referred directly in the official documentation.

Recently I started to sort things out on my beloved Raspberry PI 5, in particular I’m moving services so I can reverse proxy them on a single Apache httpd instance (you know I still love Apache :D ), today I moved around Bookstack, in particulare I did two things:

  1. change Bookstack hostname (for example from https://site.domain.tld to https://newsite.domain.tld )
  2. make Bookstack work under a specific url context (for example https://site.domain.tld/bookstack instead of https://site.domain.tld ).

On my environment I’m using the LinuxServer.io docker image, so check the project site for details, and also I’m using docker compose, if you’re not familiar with it start using it for Reorx’s sake.

Backup

First of all take a damn backup, it’s mandatory.

Seriously I’m not joking.

Stop the containers

cd /data/docker/bookstack ; docker compose down

Backup files with a simple tar, restic, kopia, whatever you want, but DO IT!

cd /data/docker/ ; tar -cpzf /backup/bookstack-backup.tar.gz bookstack

Change Bookstack hostname

This process is documented on the Bookstack documentation (LINK), but still I decided to mention it because the procedure is a little bit different on a docker container, so it’s worth spent a few words about it.

First of all you have to change the APP_URL configuration variable, in case of a docker container it’s enough to change the environment variable on the docker-compose.yaml file, so open the file and change the variable to the new url

Now you must replace the old url from the database record with the new one using the bookstack:update-url command, in case of a docker container you must identify where’s the Laravel framework artisan file and launch it accordingly to the documentation.

docker exec -it bookstack php /app/www/artisan bookstack:update-url https://site.domain.tld https://newsite.domain.tld

After that clear the cache using

docker exec -it bookstack php /app/www/artisan cache:clear

Restart the docker container to change the environment variable you previously changed with the new url.

cd /data/docker/bookstack ; docker compose down ; docker compose up -d

Done, now your Bookstack instance should be reachable to the new url.


Change Bookstack root context

This change is a little bit tricky, because it involves some webserver changes.

First of all you must repeat the same process used for changing the url hostname of your Bookstack instance, this time including the context you want to use (for example /bookstack ).

Let’s quickly review the steps:

1) Change the APP_URL environment variable in the docker-compose.yaml (APP_URL=https://newsite.domain.tld/bookstack in this case)

2) Replace the url in the database using the bookstack:update-url

docker exec -it bookstack php /app/www/artisan bookstack:update-url https://newsite.domain.tld https://newsite.domain.tld/bookstack

3) Clear Bookstack cache

docker exec -it bookstack php /app/www/artisan cache:clear

4) Restart the docker container to change the environment variable you previously changed with the new url.

cd /data/docker/bookstack ; docker compose down ; docker compose up -d

Now you must review the webserver configuration inside your docker container, in case of the LinuxServer.io container there’s a nginx instance running inside the container, you can fine its configuration inside the /config/nginx/ directory inside the container.

If you followed the LinuxServer.io recommendations the /config directory should be a persistent volume (or a persistent path on your docker host), so any changes in the nginx configuration files should not be lost in case of a container restart.

In my case the config persistent volume is located in the /data/docker/bookstack/bookstack-config directory, so the nginx configuration is located in the file /data/docker/bookstack/bookstack-config/nginx/site-confs/default.conf.

Apply this patch

wget https://tasslehoff.burrfoot.it/pub/bookstack-nginx.patch ; \
patch /data/docker/bookstack/bookstack-config/nginx/site-confs/default.conf < bookstack-nginx.patch

Reload nginx configuration

docker exec -it bookstack nginx -s reload

Done, now your Bookstack instance should work at the new url https://newsite.domain.tld/bookstack

« Post precedenti | Post successivi »